Klarna Invoice and Part Payment - Installation and User Guide
|
Product version: |
EPiServer Commerce 1.0 SP1/1 R2/1 R2 SP1 |
|---|---|
|
Document last saved: |
Table of Contents
Introduction
This document describes how to install and use the Klarna Invoice and Part Payment gateway. The module is available for EPiServer Commerce 1.0 SP1, and integrates the Klarna payment provider with EPiServer Commerce.
- To upgrade from EPiServer Commerce 1.0 to 1.0 SP1, please see the upgrading instructions.
- Download the Klarna Invoice and Part Payment module project files.
Installation
- Download the project files for Klarna payment gateway.
- Build the project EPiServer.Business.Commerce.Payment.Klarna in the download.
- Copy the EPiServer.Business.Commerce.Payment.Klarna.dll to the bin folder of both Commerce front-end and back-end sites.
- Copy the CookComputing.XmlRpc.dll and kreditor.dll in the Klarna /Lib folder to the bin folder of Commerce front-end site.
- Copy the KlarnaInvoice_EN.xml to the /lang folder of Commerce front-end site.
- Copy the following folders to /Templates/Everything/BusinessControls/CheckoutControls/plugins/payment/ or /Templates/ClickTalk/Units/Placeable/plugins/payment/ if you have 1.0 R2 of the Commerce front-end site:
- Klarna Invoice: folder KlarnaInvoice (only the files PaymentMethod.ascx, KlarnaInvoice.css and images files are required)
- Klarna Part Payment: folder KlarnaPartPayment (only the files PaymentMethod.ascx, KlarnaPartPayment.css and all image files are required) - Copy the following folders to C:\Program Files (x86)\Mediachase\eCommerceFramework\5.1\eCommerceFramework\Shared\Apps\Order\Payments\Plugins\" of the Commerce front-end site:
- Klarna Invoice: folder KlarnaInvoice (only ConfigurePayment.ascx is required)
- Klarna Part Payment: folder KlarnaPartPayment (only ConfigurePayment.ascx is required)
Configuration
- In Commerce Manager, go to Administration > Order System > Payments > Your country.
- Click the New button to create a new payment method. An example for Klarna Part Payment is shown below.
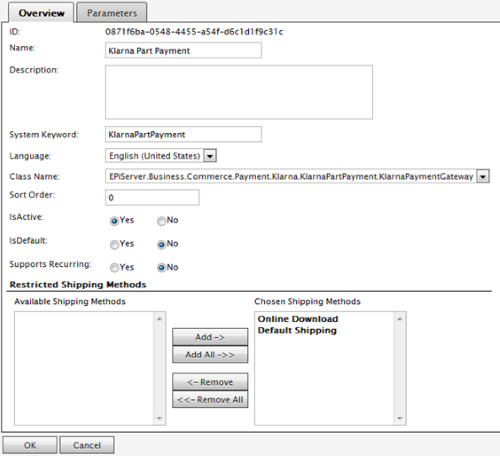
- In the Overview tab, enter the following required information for Klarna invoice/Part Payment methods respectively:
Field name Value Klarna Invoice Value Klarna Part Payment Name Klarna Invoice Klarna Part Payment Description Klarna Invoice payment gateway Klarna Part Payment gateway System Keyword KlarnaInvoice KlarnaPartPayment Language The language of your choice The language of your choice Class Name EPiServer.Business.Commerce.Payment.
Klarna.KlarnaInvoice.KlarnaPaymentGatewayEPiServer.Business.Commerce.Payment.Klarna.
KlarnaInvoice.KlarnaPaymentGatewayIsActive Yes Yes IsDefault No No Supports Recurring No No Restricted Shipping Methods Add all Add all - Click OK.
- Go to the Parameters tab to edit the Klarna Part Payment payment method.
- Enter the following required information, depending on the payment method to use, see explanation below.
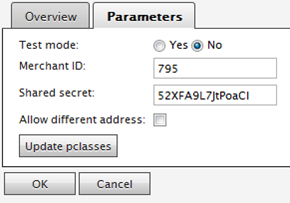
Parameters configuration tab for Klarna Part Payment.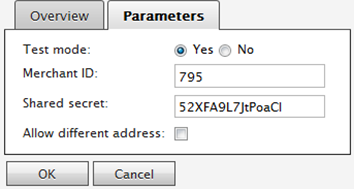
Parameters configuration tab for Klarna Invoice.
Field name Description Value Test mode If you designate this flag an invoice is created in test mode, even if your store is fully operational. Recommended for testing without disrupting regular invoicing Yes or No Merchant ID The store ID got from Klarna Sample value: 795 Shared secret The shared secret number got from Klarna Sample value: 52XFA9L7JtPoaCl Allow different address If this flag is checked, the EPiServer Commerce system will not verify the customer entered address. It will depend totally on Klarna to verity the address Yes or No Update pclasses button Only for Klarna Part Payment: will update the pclasses from Klarna. Remember to click OK in the next step as well, to save the pclasses
Click button to update - Click OK to save
- Add the following setting to the AppSettings in web.config of your Commerce front-end site:
<appSettings>
<add key="KlarnaPaymentUrl" value="http://beta-test.kreditor.se:4567" />
</appSettings>
The value to use here is the URL received when registering your store with Klarna.
Using the Klarna Part Payment Option with EPiServer Commerce
Place an order as follows:
- Add item to shopping cart and proceed to checkout.
- Select a shipping address, shipping option and change to payment options. Depending on your current country (in the shipping address), different forms for input will appear.
Sweden, Finland, Denmark and Norway
The following applies to customers from Sweden, Finland, Denmark and Norway:
- In the Payment Options, select the Part Payment option.
- In Social Security No, enter your social security number.
- Click Review and Place Order.
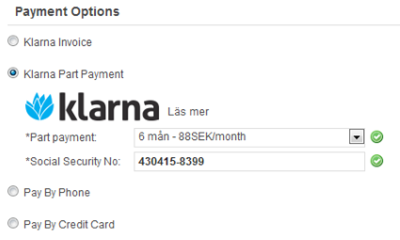
NOTE that Klarna Part Payment will not accept a company account.
Netherlands and Germany
The following applies to customers from Netherlands and Germany:
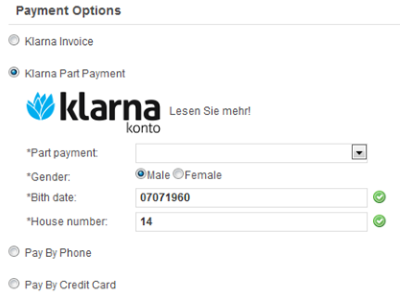
- For Part Payment, select the Part Payment option.
- Enter Gender, Birth date and House number and optional house extension.
- Click Review and Place Order.
Finalization and order confirmation:
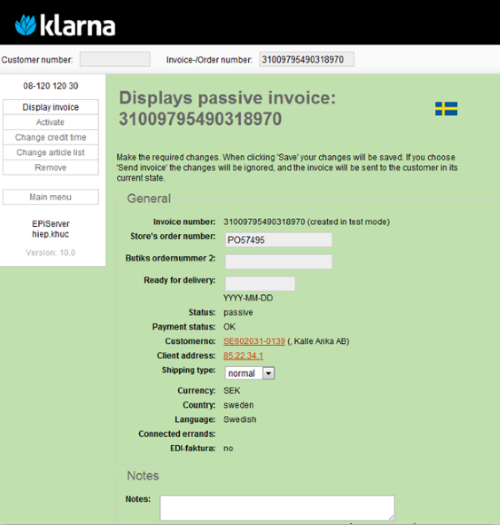
- If your order is successfully processed, you will see your order number. An e-mail is also sent to you to confirm your order.
- If you are a store owner, you can see the details of the order in the invoice of the Klarna system. You can use the TestPerson from Klarna for testing, find out more here: http://integration.klarna.com/en/api-functions/test-persons.
Using the Klarna Invoice with EPiServer Commerce
Place an order as follows:
- Add item to shopping cart and proceed to checkout.
- Select a shipping address, shipping option and change to payment options. Depending on your current country (in the shipping address), different forms for input will appear.
Sweden, Finland, Denmark and Norway
The following applies to customers from Sweden, Finland, Denmark and Norway:
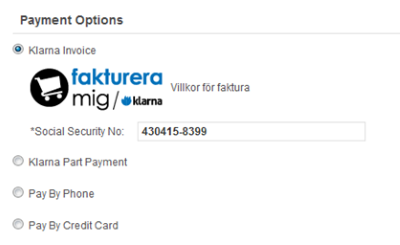
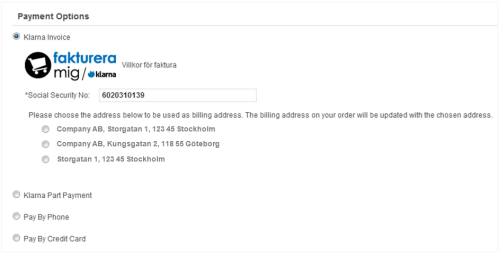
- In the Payment Options, select the Klarna Invoice option.
- In Social Security No, enter the social security number for a company and select an address from the list.
- Click Review and Place Order.
Netherlands and Germany
The following applies to customers from Netherlands and Germany proceed as follows:
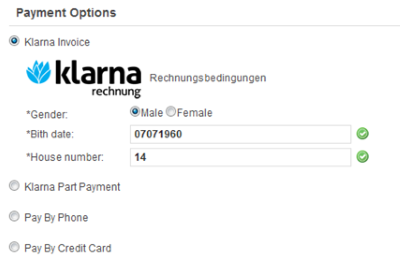
- In the Payment Options, select the Klarna Invoice option.
- Enter Gender, Birth date and House number and optional house extension.
- Click Review and Place Order.
Finalization and order confirmation:
- If your order is successfully processed, you will see your order number. An e-mail is also sent to you to confirm your order.
- If you are a store owner, you can see the details of the order in the invoice of the Klarna system. You can use the TestPerson from Klarna for testing, find out more here: http://integration.klarna.com/en/api-functions/test-persons.
