TinyMCE Developers Guide
|
Product version: |
EPiServer CMS 6.0 |
|---|---|
|
Document version: |
1.0 |
|
Document last saved: |
This document contains various topics concerning development with the TinyMCE editor.
Contents
- Adding a TinyMCE plug-in
- Add the JavaScript
- Create empty class with TinyMCEPlugIn attribute
- Translations
- Test the plugin - Using the TinyMCE Editor from Template Pages
- Configuration options
- Setting an EPiServer property in editable state
- Using the TinyMCE web control
- Setting up TinyMCE manually with JavaScript
Information on how to create the client side code of a TinyMCE plug-in is found at http://tinymce.moxiecode.com
Adding a TinyMCE Plug-in
Add the JavaScript
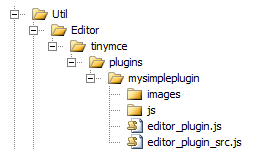
First of all the JavaScript files, and possibly dialog files etc, for the TinyMCE plug-in has to be added to EPiServer CMS. The TinyMCE version included in EPiServer CMS is located in ~/Util/Editor/tinymce and your plug-in files should be added to the subfolder “plugins”.
Since ~/Util/ is a virtual path pointing to C:\Program Files… and we don’t recommend adding files there, you have two ways to accomplish this.
- Add a physical folder structure from site root, /Util/Editor/tinymce/plugins, to put your plug-in files into.
- Add another virtual path pointing to either ~/Util/ folder or directly to ~/Util/Editor/tinymce/plugins, something like the example below. If you choose to add a virtual path remember that the last VPP added will be the first one called when the system starts looking for files, hence your new VPP should probably be added in the beginning of all VPPs.
<add name="TinyMCEPlugins" virtualPath="~/Util/Editor/tinymce/plugins" physicalPath="C:\MyTinyMCEPlugins" type="EPiServer.Web.Hosting.VirtualPathNonUnifiedProvider,EPiServer" />
More information about development of TinyMCE plug-ins can be found at http://tinymce.moxiecode.com where file and folder naming also is explained in more detail. In short the plug-in folder you create should have the same name as the name of the plug-in added to TinyMCE PluginManager and the main JavaScript files responsible for registering the plug-in are named editor_plugin.js and editor_plugin_src.js where the first could/should be a compressed version of the last.
Create an empty class with TinyMCEPlugIn attribute
In EPiServer CMS, we have two plug-in attributes called “TinyMCEPluginButton” and “TinyMCEPluginNonVisual” which contains data EPiServer CMS needs to correctly show the plug-in in edit and admin mode. Which attribute to use depends on what type of plug-in you are creating. If the plug-in has one or more buttons the “TinyMCEPluginButton” should be used, if not use “TinyMCEPluginNonVisual” attribute. The existing plug-ins within EPiServer CMS have an empty class with the attribute, so when creating a new plug-in a new class must be created.
Example of a TinyMCE plug-in with button:
[TinyMCEPluginButton(PlugInName = "mypluginwithbutton", ButtonName = "mybutton", GroupName = "misc", LanguagePath = "/admin/tinymce/plugins/mypluginwithbutton/mybutton", IconUrl = "Editor/tinymce/plugins/mypluginwithbutton/mybutton.gif")]
    public class MyPluginWithButton
    {
    }
Example of a non visual TinyMCE plug-in:
[TinyMCEPluginNonVisual(LanguagePath = "/admin/tinymce/plugins/mysimpleplugin", PlugInName = "mysimpleplugin"]
    public class MySimplePlugin
    {
    }
The properties of the attributes explained:
PlugInName
The name of the TinyMCE plug-in, this must correspond to the plug-in name registered in TinyMCE PluginManager (and sub folder name in plugins folder).
LanguagePath
Set this property to the point in the language xml where the new plug-in was placed. This path is used to get correct translations of the plug-in in the Plug-in Manager, see Translations below.
EditorInitConfigurationOptions
A string representing a JSON object with configuration settings to set in the TinyMCE init. You may override any init settings here but be careful with conflicts between different plug-ins. Normally, settings will be overridden but there is a possibility to merge configuration settings, which makes it possible for several plug-ins to alter the same setting. By default, the settings that will be merged if nothing is changed in the configuration file are valid_elements, extended_valid_elements, invalid_elements, and valid_child_elements. To change which settings that will be merged, add an element called “tinyMCE” in the “EPiServer section” in the configuration file, and set the attribute “mergedConfigurationProperties” on the element to the elements that will be merged.
<tinyMCE mergedConfigurationProperties="valid_elements, extended_valid_elements, invalid_elements, valid_child_elements">
Example usage of EditorInitConfigurationOptions: If your plug-in needs to extend the img element with some attributes you could add the following:
[TinyMCEPluginButton(PlugInName = "Whatever", ..., EditorInitConfigurationOptions = "{ extended_valid_elements: 'img[class|src|border=0|alt|title|hspace|vspace|width|height|align|onmouseover|onmouseout|name]' }")]
Information about plug-in overrides can be found for each page type in admin mode. In the tab “Page Type”, click on a page type to check if there is any plug-in conflicts for the type. If there’s any conflict, a yellow warning message will be shown specifying which plug-in that has overridden a specific value. Overriding EPiServer CMS default confiuration options will not cause warning messages.
Documentation of TinyMCE init configuration options can be found in TinyMCE Wiki.
GroupName
(Only button attribute). The group name of the plug-in. This is used in admin mode for grouping the tools in the inactive buttons area. You can specify your own or use one of these defaults:
- misc
- textchar
- textpara
- media
- paste
- table
If you specify your own group you should also add translations in the language files like:
<admin>
  <propertysettings>
    <tinyeditorsettings>
      <groups>
        <mygroupname>
ButtonSortIndex
(Only button attribute). Sort index used when sorting the buttons within a group in the inactive part of the editor admin.
ButtonName
(Only button attribute). Name of the TinyMCE button. This must correspond to the name of the button added by the plug-in the JavaScript file.
IconClass
(Only button attribute). The CSS class to use for the plug-in icon. For internal use but could be useful when you want to map existing CSS classes to other buttons.
IconUrl
(Only button attribute). If there is no CSS class to style the button with background image you can enter an URL to an image that will be displayed in admin mode. The URL is relative to Util folder.
AlwaysEnabled
(Only NonVisual attribute). If this property is set to true the plug-in will always be on. The only possibility to disable an always enabled plug-in is to disable the plug-in in the Plug-in Manager in admin.
Translations
In the language xml there is a section under admin called “tinymce”. In that element you will find all the plug-ins supported in the CMS. A recommended way to organize your plug-ins is to add a new element under the “plugins” element with the same name as the plug-in. In this element, add elements named “displayname” and “description” with descriptive texts. This will give you translations for the plug-in in the EPiServer CMS Plug-in Manager. The LanguagePath parameter described above must match this xml path. If the plug-in has one or more buttons you should create a sub element for each button and within that put the “displayname” and “description” elements.
<admin>
      <tinymce>
        <plugins>
          <mypluginwithbutton>
            <mybutton>
              <displayname>My Button</displayname>
              <description>Button to click for magic things to happen</description>
            </mybutton>
          </mypluginwithbutton>
          ...
To also get translations working for the editor itself you need to add a section under tinymce element at same level as admin element. Note that if you have an existing TinyMCE plug-in (there are plenty to download) they all use The naming convention for the elements are:
- Plug-in element with the same name as the plug-in.
- Button element with the same name as each button in the plug-in followed by “_desc”. These are used in admin mode to get a translated tooltip for each button.
- Additional translations that you possibly need for dialogs etc, named the way you want to reference them in JavaScript and HTML code.
<tinymce>
      <mypluginwithbutton>
        <myButton_desc>My Button</myButton_desc>
        <mySecondButton_desc>Another button</mySecondButton_desc>
        <additionaltext>Extra text</additionaltext>
      </mypluginwithbutton>
      ...
See below code for an example on how to reference the translations from within JavaScript plug-in.// Register example button
ed.addButton('mybutton', {
title : 'mypluginwithbutton.mybutton_desc',
cmd : 'mceMyButton',
image : url + '/myButton.gif'
});
Test the plug-in
After adding the plug-in, go to a page type in admin mode and click on “MainBody” on the page type. Go to the custom settings tab and choose “use custom settings”. The new plug-in should now be displayed under “Inactive tools” or "Plugins without a button" depending on the type of plug-in you have created. Hold the mouse over the button and look at the tooltip. Add the plug-in to the PropertyXhtmlStringControl by dragging it to one of the rows under “Editor Toolbar” or check the checkbox if it is a non-button plug-in. Save the changes and go to edit mode to test the plug-in.
Using the TinyMCE Editor from Template Pages
Configuration Options
There are three ways of getting the TinyMCE Editor onto template pages:
- Using an EPiServer property web control connected.
- Explicitly adding the EPiServer TinyMCE web control to the template page.
- Adding a text area control to the page and initializing TinyMCE manually with Javascript.
Setting an EPiServer Property in Editable State
The simplest way to get an editor onto a template page is to set EditMode=”true” on a property control rendering an XHTMLProperty. The property control will then render its edit mode interface, i.e. the TinyMCE Editor. The code below will render the MainBody property inside the TinyMCE Editor and a save button right below it.
<EPiServer:Property PropertyName="MainBody" runat="server" EditMode="true" />
<asp:Button OnClick="SaveData" Text="Save" runat="server" />
Now, when we have an editor and a save button on the page, we have to handle the click on the save button. That has to be done in the code behind of our aspx page. To have EPiServer CMS save the changes back to the page, we must set the SaveCurrentPage.OptionFlag on the base constructor and also make the PageData writable on post-back. Then the page is saved in the SaveData button click handler.
public partial class Page : TemplatePage
{
    // Have to set the SaveCurrentPage flag on the page.
    // By doing that the CMS will handle saving for us
    public Page() : base(SaveCurrentPage.OptionFlag) { }     protected override void OnInit(EventArgs e)
    {
        base.OnInit(e);
        if (IsPostBack)
        {
            // The PageData is read-only for performance reasons.
            // Make it writable so it's possible modify
            CurrentPage = CurrentPage.CreateWritableClone();
        }
    }     protected void SaveData(object sender, EventArgs e)
    {
        // Save the page as a published version
        this.SavePageHandler.RequestedSaveAction =
            EPiServer.DataAccess.SaveAction.Publish;
        this.SavePage();
    }
}
Using the TinyMCE Web Control
To use the TinyMCE web control on your page there are a few simple steps you’ll have to perform.
- Register the TinyMCE web control namespace on your aspx page.
This is done by adding the following directive in the top of your aspx or ascx file.
<%@ Register TagPrefix="tinyMCE" Namespace="EPiServer.Editor.TinyMCE" Assembly="EPiServer" %> - Add the TinyMCE Editor control and a save button to your page.
<tinyMCE:Editor ID="myEditor" Width="300" Height="200" theme="simple" runat="server" >Hello tinyMCE!</tinyMCE:Editor><asp:Button OnClick="SaveData" Text="Save" runat="server" /> - Create a SaveData event handler in your code behind page to handle the click on Save button.
Your code behind page class should look similar to the code below.public partial class Page : TemplatePage
{
protected void SaveData(object sender, EventArgs e)
{
// Do something useful with the text
string text = myEditor.Text;
myEditor.Text = "!!" + text + "!!";
}
}
Now all that’s left is to add some sensible logic for storing the text retrieved from the editor.
Configuring the TinyMCE editor toolbars
In the example above you ended up with the standard TinyMCE simple theme toolbar with the most basic editor functionality. Even if this may be sufficient in many situations you’ll eventually want to add more advanced tools to the toolbar. In the current implementation this has to be done in the code-behind page, preferably in the Page_Load method.
To add custom buttons to the editor toolbar you first have to add rows to the ToolbarRows collection of the editor. In the example code below we first define two toolbar rows as string arrays. Then new toolbar rows are added to the editor instance using the string arrays as tool definitions.
protected override void OnLoad(System.EventArgs e)
{
     base.OnLoad(e);
    // Define the toolbar buttons as arrays of tool names.
    string[] row1 = new string[] { "bold", "italic", "underline" };
    string[] row2 = new string[] { "link", "unlink" };     // Add the toolbars to the editor instance
    myEditor.ToolbarRows.Add(new ToolbarRow(row1));
    myEditor.ToolbarRows.Add(new ToolbarRow(row2));
}
Besides the button configuration, there’s another important configuration property to know about, the NonVisualPlugins collection. This configuration collection is used to add plug-ins that doesn’t have a visual user interface. Such plug-ins just provide new, or change the standard editor functionality. One example of such a plug-in is the episearchreplace plug-in which replaces the standard TinyMCE search to prevent search and replace inside dynamic content.
Visit http://wiki.moxiecode.com/index.php/TinyMCE:Control_reference for a list of available tools and plug-ins.
Changing TinyMCE initialization options
As a developer you also have the possibility to change or add initialization options for TinyMCE. This is done by altering the InitOptions dictionary on an editor control instance. The InitOptions property exposes a collection of key-value pairs used for initializing the editor on the client side.
The code below shows how you add or change settings this dictionary.
protected override void OnLoad(EventArgs e)
    {
        base.OnLoad(e);         // Only initialize the editor Gecko based browsers
        myEditor.InitOptions["browsers"] = "gecko";         // Convert all new line characters to br elements
        myEditor.InitOptions["convert_newlines_to_brs"] = true;
    }
These initialization options can also be set on the editor control from markup, where all unknown attributes on the editor control are automatically added to the InitOptions dictionary.
Visit http://wiki.moxiecode.com/index.php/TinyMCE:Configuration for a complete reference of available configuration options.
Setting up TinyMCE Manually with Javascript
If you don't want to use much of the server-side functionality but still want to use EPiServers Javascript and plug-ins, it might be a good way to add the editor manually using Javascript. Remember though that the editor still needs jQuery so to fully use the functionality you need to be logged in or set up client resources so that it is possible to use them while not logged in (explained how in other documentation).
First you need to include jQuery and tiny_mce javascript on the site.
<script type="text/javascript" src="/EPiServer/Shell/ClientResources/EPiJQuery.js"></script>
<script type="text/javascript" src="/Util/Editor/tinymce/tiny_mce.js" ></script>
Also, some EPiServer plug-ins have a need for more scripts that this. Since some of the EPiServer plug-ins uses internal Url resolve methods to get the paths to for example image editor and filebrowser we also need to include some EPiServer scripts. These are system.js and system.aspx.
<script src="/main/EPiServer/CMS/javascript/system.js" type="text/javascript"></script>
<script src="/main/EPiServer/CMS/javascript/system.aspx" type="text/javascript"></script>
Now you can write your TinyMCE init method to get the editor up and running with the plugin you want. Here is an example of a init method with uses the EPiServer TinyMCE skin and some EPiServer plug-ins.
<script>
            tinyMCE.init({
                mode: "textareas",
                theme: "advanced",
                skin: "epi-light",
                plugins: "wordcount,epiexternaltoolbar,epilink",
                theme_advanced_toolbar_location: "top",
                theme_advanced_toolbar_align : "left",
                theme_advanced_statusbar_location: "bottom",
                theme_advanced_buttons1 : "link,epilink",
                theme_advanced_buttons2 : "",
                theme_advanced_buttons3 : "",
                theme_advanced_resizing: true
            });
        </script>
        <textarea name="content" style="width:100%"></textarea>
Remember in the above example that the epiLink plug-in needs special rights to be able to pick a page from the page tree or a document from the file browser. For available plug-ins for TinyMCE and configuring the editor via the init function, please refer to the TinyMCE wiki http://wiki.moxiecode.com/index.php/TinyMCE:Index.