How to remove an EPiServer Commerce site
Based on CMS 6, Commerce 1.0 SP1, and Windows Web Server 2008
This blog is intended to describe how to remove an EPiServer Commerce site and the related framework files. Now, you may be asking yourself a very good question: “Why would ANYONE ever want to do this?” Great question. I mean, it’s so comprehensive and extensible, why would you?!? But lets just assume you made some silly mistake, like you installed it on a home machine thinking it wouldn’t do what you need and you were looking at a competitive product, only to find ALL of your life’s wishes and dreams solved by this simple component of the comprehensive EPiServer platform. Who knew software was the key to solve all of the World’s problems? Hmm…
The first thing to note is that there are two sites to be removed. One is the CMS site, which if you used the EPiServer Commerce Sample Package is represented by the “Click + Talk” store site. The other is the Commerce Manager site. Removing the first site is easy, as you can use Deployment Center to follow the same removal steps you’d use for any CMS site, by using the “Delete Site” option. A sample screen shot is below, however, I will skip the details on removing a standard CMS site since you are likely already familiar with this process and I will move on to the Commerce Manager removal instructions.
Below you will find a brief summary of the items that need to be cleaned up for the Commerce Manager site:
- Quartz service
- SQL database
- SQL database user
- Commerce Manager site on local file system
- Application files
Lets discuss removing each. The examples will walk through removal on Windows Web Server 2008, so please bare in mind different OS version instructions may vary.
Quartz service
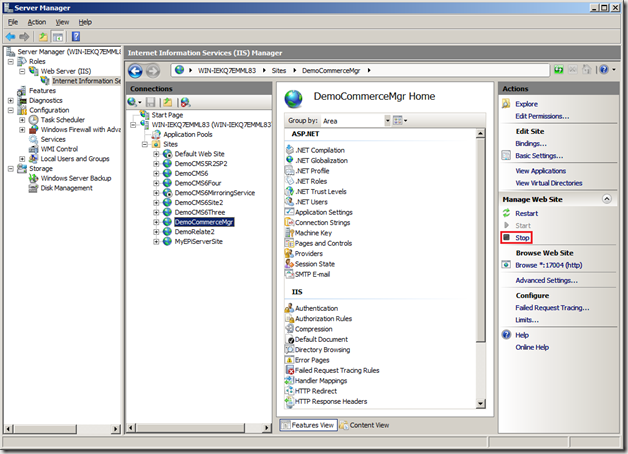
1. First, to make sure the running site doesn’t get in the way, open IIS, navigate to the Commerce Manager site, and select the “Stop” button.
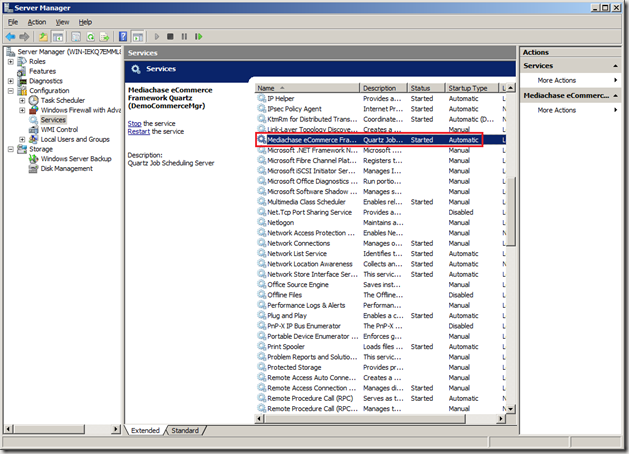
2. Access the Services Manager and locate the “Mediachase eCommerce Framework Quartz” service for the site you wish to remove.
3. Right click on the service and Select Properties. Validate the site name in the display name is the right one for the site you wish to remove.
4. Select the “Stop” button to stop the service.
5. Copy the “Service name” from this window. In the screen shot above it is “ECF$DemoCommerceMgr”.
6. Select the “OK” button to close the window.
7. Open a command prompt window as an administrator (i.e. if you are part of the Administrator group just run it normally otherwise right click and select “Run as administrator”).
8. At the command prompt type “sc delete ” and paste the service name you captured in the step a few above so that the command reads “sc delete <service name>” (e.g. “sc delete ECF$DemoCommerceMgr”).
8. Press the Enter key to execute the command. This should remove the service.
SQL database
1. Open the SQL Server Management Studio (if you do not have this installed google for the instructions to delete the site via the available command line tools).
2. Locate the Commerce Manager site in the SQL Server Management Studio under the “Databases” node. If you accepted the defaults, it may be “ECF51_B2CSampleSite”.
3. Right click on the site and select “Delete”.
4. Select the “OK” button on the “Delete Object” window to remove the database.
SQL database user
1. The Commerce installer creates a user for you in the database based on a name you specify. At the time of writing this blog this user is created in the Commerce 1.0 SP1 installation instructions at the section titled “Installing EPiServer Commerce”, step 4.
2. Assuming you still have SQL Server Management Studio open from the previous steps, expand the “Security” node and its child “Logins” node (if you do not have this installed google for the instructions to delete users via the available command line tools).
3. Find the user created during the Commerce installation steps referenced in step 1 above.
4. Right click on this user name and select “Delete”. The default is “ecfuser” but I named mine “commeremgr” and the following screen shot reflects this.
5. Select the “OK” button on the “Delete Objects” window.
6. Select the “OK” button when asked to confirm the delete operation.
Commerce Manager site on local file system
1. Navigate to the Commerce Manager site site on the local file system in Windows Explorer. Typically this is C:\EPiServer\Sites\<site name> (e.g. C:\EPiServer\Sites\DemoCommerceManager\).
2. Right click on the site name and select “Delete”.
3. Select the “Yes” button when asked to confirm the delete operation.
Application files
1. Navigate to the Commerce framework files on the local file system for the site in Windows Explorer. Typically this is at C:\Program Files\Mediachase\eCommerceFramework\5.1\<site name> (e.g. C:\Program Files\Mediachase\eCommerceFramework\5.1\DemoCommerceMgr).
2. Right click on the site and select “Delete”. Follow similar steps to those as noted in steps 2 and 3 in the previous section.
I hope this helps. Please note that my understanding is that future releases of EPiServer Commerce will include functionality to remove these items as part of the Deployment Center. However, I say that with the giant disclaimer that I do not work in Product Management, have no control over product functionality, and have limited insight to it. :)


Hi Jeff!
Great post. You forgot just one thing and that is the SQL Server Login that the Mediachase installer creates (by default called ecfuser).
/Paul.
Technically I vaguelly said delete any users created. ;) Hehe. However, I've now made a proper update to include further details on deleting the DB user created by the installer. Let me know if I've overlooked anything.
Thanks!
Validated and confirmed the same steps can be used for manual removal of a Commerce R2 site. Also note, the instructions above should include deleting the CommerceManager site in IIS. I will update them at a later time.
Thanks for posting this. Just went through the steps, even the one in the comments about IIS (was wondering about that while I was in the thick of it).