
How to run Optimizely CMS on VS Code Dev Containers
VS Code Dev Containers is an extension that allows you to use a Docker container as a full-featured development environment. Instead of installing tools like DotNet, SQL and Optimizely CMS directly on your local machine, you run them inside a container that VS Code connects to.
For this example I set up an Optimizely CMS Dev Container on my M3 MacBook to keep everything isolated from my personal system.
Prerequisites
Before we start with we need to install a few prerequisite tools:
Start Docker Desktop and VS Code. This tutorial is done from VS Code and Terminal sessions within VS Code.
Quick Start
-
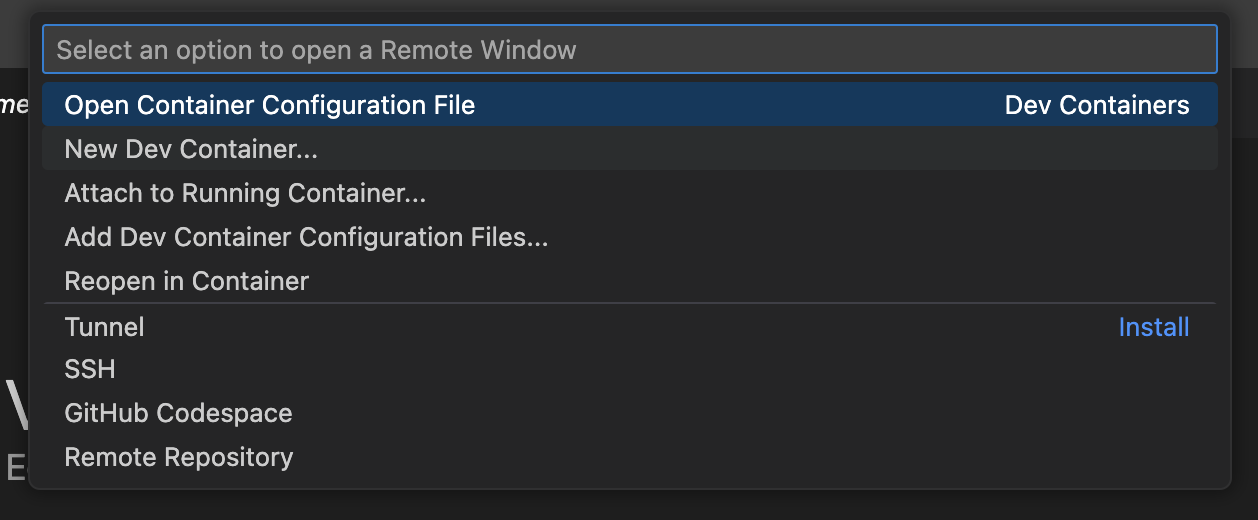
Click the container icon in the bottom left of VS Code.

-
Select "New Dev Container..."
-
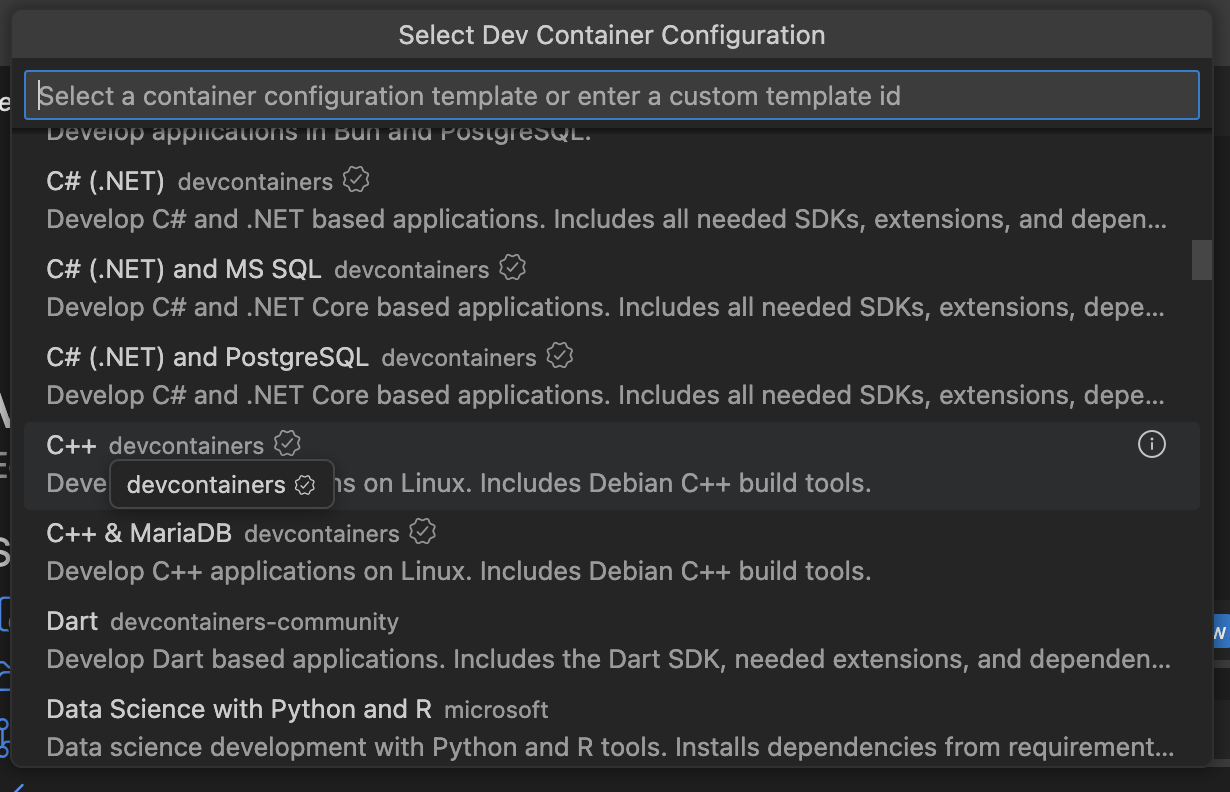
Choose the C# (.NET) devcontainer
-
Then confirm that you want to create the dev container.

If this is your first container of this type it will take a while to download. When it has finished you can open a terminal in VS Code and verify the file structure is different to your local PC. ls / for example. If you open a terminal on your host system that will still be your local PC.
Missing Features
We now have an isolated .NET development environment in a Dev Container. However we are missing some features to work with CMS 12 and 13 preview.
- First we install additional .NET SDKs:
wget https://dot.net/v1/dotnet-install.sh -O dotnet-install.sh chmod +x dotnet-install.sh dotnet-install.sh --channel 8.0 --install-dir /usr/share/dotnet dotnet-install.sh --channel 10.0 --install-dir /usr/share/dotnet dotnet --list-sdks - Next we add the Optimizely tools:
dotnet new install EPiServer.Templates
dotnet dev-certs https --trust
dotnet tool install EPiServer.Net.Cli --global --add-source https://nuget.optimizely.com/feed/packages.svc/
We can now create a site and rebuild the container environment when needed. However we will need to rerun these commands after rebuilding the container so lets integrate them into a new devcontainer config.
Dev Container JSON
You will find this configuration file in .devcontainer above .github
Replace your devcontainer.json content with this example:
// For format details, see https://aka.ms/devcontainer.json. For config options, see the
// README at: https://github.com/devcontainers/templates/tree/main/src/dotnet
{
    "name": "Optimizely (.NET)",
    // Or use a Dockerfile or Docker Compose file. More info: https://containers.dev/guide/dockerfile
    "image": "mcr.microsoft.com/devcontainers/base:ubuntu",
    "runArgs": [
        "--network=host"
    ],

    // Features to add to the dev container. More info: https://containers.dev/features.
    "features": {
        "ghcr.io/devcontainers/features/dotnet:2.4.2": {
            "version": "8.0",
            "additionalVersions": ["9.0, 10.0"]
        }
    },

    // Use 'forwardPorts' to make a list of ports inside the container available locally.
    "forwardPorts": [5000],
    "portsAttributes": {
        "5000": {
            "protocol": "https"
        }
    },

    // Use 'postCreateCommand' to run commands after the container is created.
    "postCreateCommand": {
        "Templates": "/usr/bin/dotnet new install EPiServer.Templates && /usr/bin/dotnet dev-certs https --trust",
        "ToolInstall": "/usr/bin/dotnet tool install EPiServer.Net.Cli --global --add-source https://nuget.optimizely.com/feed/packages.svc/"
    }

    // Configure tool-specific properties.
    // "customizations": {},

    // Uncomment to connect as root instead. More info: https://aka.ms/dev-containers-non-root.
    // "remoteUser": "root"
}
In this example:
- Multiple versions of .NET SDK installed for CMS 12 and 13 support.
- Ubuntu base image used for compatibility with the .NET tooling.
- Network access added to be able to connect to other services and containers.
- Port 5000 opened up for CMS site hosting.
- Post create commands added to setup Optimizely tools.
When you save the configuration you will get a prompt in the bottom right to Rebuild. Click it. If you miss it then click the icon in the bottom left to get the an option list, select Rebuild Container.
After rebuild we will be in the same state as before but with no manual steps required.
Alloy Tech Build Test
Now we can create and build an Optimizely Alloy Tech site in a VS code command prompt.
dotnet new epi-alloy-mvc -n alloy13preview
dotnet build
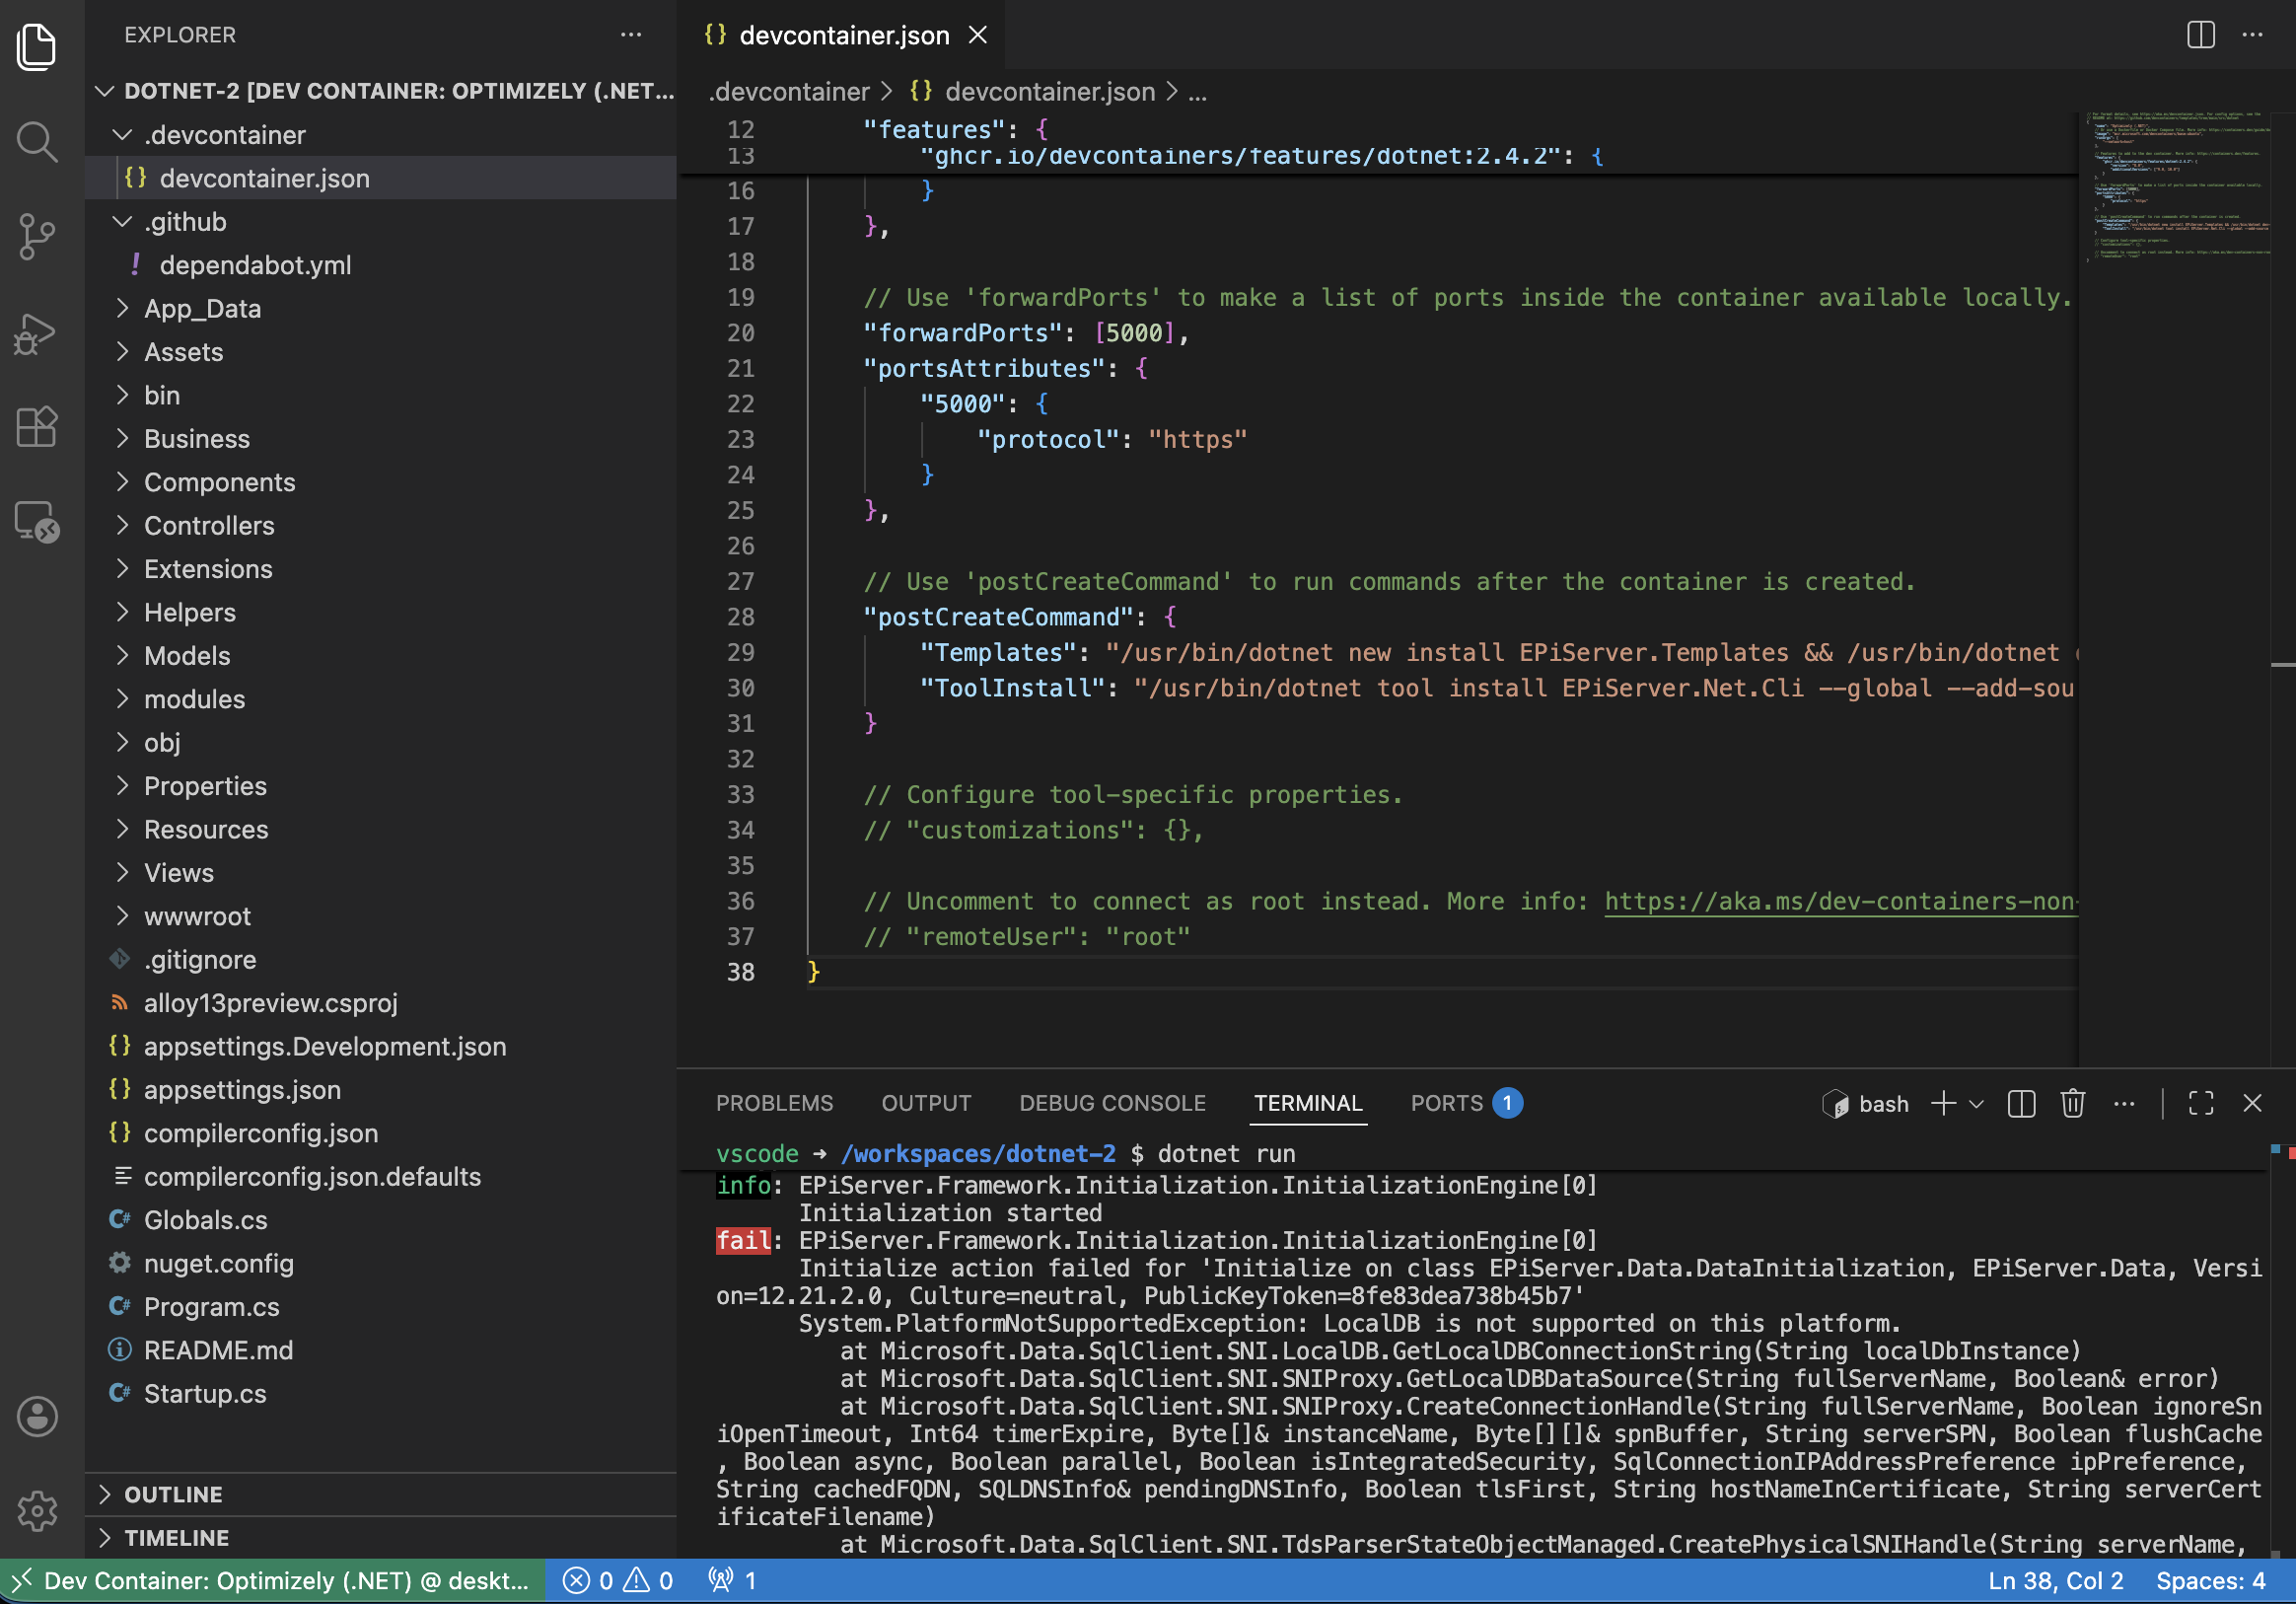
dotnet runWhen you run this in a Silicon Mac you will get an error that the local DB is not supported on this hardware.
To resolve this we can connect to a SQL server on a container that does support Silicion Macs. The DevContainer is configured to use the host network so it can access any network shared database.
Lets download Azure SQL Edge container for a multi-platform SQL server:
docker pull mcr.microsoft.com/azure-sql-edge:latestThis requires some settings to run correctly. Review the below command and change details as required. We will need these values to build the Connection String in the CMS solution.
docker run --cap-add SYS_PTRACE -e 'ACCEPT_EULA=1' -e 'MSSQL_SA_PASSWORD=s3cret-Ninja' -p 1433:1433 --name azuresqledge -d mcr.microsoft.com/azure-sql-edgeInstall the SQL Server extension to VS Code. Note that this gets installed to the container not your host system.
Now we need to connect to the DB server using the settings we started the docker container with.
Once connected we create a database for the CMS to use. There is minimal GUI in this extension so an SQL script can be used for this.
-- Create a new database called 'CMS'
-- Connect to the 'master' database to run this snippet
USE master
GO
-- Create the new database if it does not exist already
IF NOT EXISTS (
    SELECT name
        FROM sys.databases
        WHERE name = N'CMS'
)
CREATE DATABASE CMS
GO
Now we build up a standard connection string using the values from previous commands. Place this in appsettings.Development.json in the Optimizely solution.
  "ConnectionStrings": {
    "EPiServerDB": "data source=tcp:localhost,1433;Database=CMS;User Id=sa;Password=s3cret-Ninja;Encrypt=True;TrustServerCertificate=True;Connect Timeout=30"
  },
Finally setup database schema updates:
Enable Automatic Creation of Database Schemas
Now we can run the solution again and confirm it can start. Click the button prompt to open a host browser window for you while the solution and DB run on containers.
dotnet runWe have port 5000 exposed to the host system so you access Optimizely admin setup and site as usual. You will see a 1 on the ports tab and can check that tab to review network ports enabled.
Finished for now
You are now ready to experiment, isolated away from your host system. Git can be used with the solution files as normal. In VS Code make sure you save the workspace, you may want to relocate the solution to your standard source / repos folder. The devcontainer.json is a lightweight way to share your container from Git.
Personally I will be using this to experiment with CMS 13, extensions and add ons. Disposing and recreating them to work with different setups.
Clean up
If you experiment with the container configs you will have multiple container instances in Docker Desktop. In the images section there will be the base images used to build containers and the instance images. In volumes will be the drive mounts for the containers.
References
- Developing inside a Container
- Dev Container Features
- Dev Container Templates
- How to run Optimizely CMS on VS Code Dev Containers · Intuitive Tech
Comments