
How to set primary (default) and secondary (optional) fonts for TinyMCE in EPiServer CMS 11
Aim
The client requirements were to have the generic TinyMCE editors (XhtmlString), across the EPiServer CMS (v11.20) site, to give content editors the ability to have only primary (default) and secondary (optional) custom fonts to use. Either font is to be used in the following block formats:
P, H1, H2, H3, H4, H5 and H6
Situation
There was a lot of information on the Net, in various EPiServer blogs, on how to set styles (font colours, font sizes, etc.) but very little up-to-date information on how to change the actual fonts to custom ones. After a lot of research, and even more trial and error, we finally came up with a workable solution.
Solution
- The first thing to do is to make changes to the ‘editorStyles.css’ file. Ours was in ‘[EPiServer website]\ClientResources\Styles\editorStyles.css’. We needed to add two custom fonts, ‘Solomon’ and ‘BornReady’ and create CSS classes that use them, hence:
@font-face {
    font-family: Solomon;
    font-style: normal;
    font-weight: 400;
    font-stretch: normal;
    src: url(/assets/main/fonts/solomon/normal_normal_normal.woff2) format("woff2"),
         url(/assets/main/fonts/solomon/normal_normal_normal.woff) format("woff")
}

@font-face {
    font-family: BornReady;
    font-style: normal;
    font-weight: 400;
    font-stretch: normal;
    src: url(/assets/main/fonts/bornreadyupright/normal_normal_normal.woff2) format("woff2"),
         url(/assets/main/fonts/bornreadyupright/normal_normal_normal.woff) format("woff")
}

.bornready {font-family: BornReady,sans-serif,Arial,Verdana,"Trebuchet MS";}

.solomon {font-family: Solomon,sans-serif,Arial,Verdana,"Trebuchet MS";}
Note the use of fallback fonts in the CSS classes (good practice).
2. The next thing to do is to create an initialisation module for the TinyMCE editor and configure it so the TinyMCE editor operates as per the client’s requirements.
Ours looks like this:
[ModuleDependency(typeof(TinyMceInitialization))]
public class CustomTinyMceInitializationModule : IConfigurableModule
{
    public void Initialize(InitializationEngine context)
    {}

    public void Uninitialize(InitializationEngine context)
    {}

    public void ConfigureContainer(ServiceConfigurationContext context)
    {
        context.Services.Configure<TinyMceConfiguration>(config =>
        {
            config.Default()
            .AddEpiserverSupport()
            .AddSetting("paste_as_text", true)
            .AddSetting("paste_webkit_styles", true)
            .AddSetting("paste_merge_formats", true)
            .AddSetting("paste_remove_styles_if_webkit", true)
            .AddPlugin("epi-link epi-dnd-processor epi-personalized-content help image fullscreen lists searchreplace hr table paste media code")
            .Toolbar("bold italic superscript subscript quote citation bullist numlist undo redo | styleselect formatselect removeformat",
                "epi-link epi-unlink anchor | cut copy paste pastetext pasteword | table | code | image epi-image-editor | epi-personalized-content | fullscreen ")
            .ContentCss("/ClientResources/Styles/editorStyles.css")
            .BodyClass("solomon")
            .StyleFormats(new {title = "BornReady font", selector = "p,h1,h2,h3,h4,h5,h6", classes = "bornready"})
            .BlockFormats("Paragraph=p;Header 1=h1;Header 2=h2;Header 3=h3;Header 4=h4;Header 5=h5;Header 6=h6;");
        });
    }
}
Points to note:
-
- Add ‘styleselect’ and ‘formatselect’ items to the toolbar setting.
-
- Tell TinyMCE what stylesheet to use. This is done by adding the line, ‘.ContentCss(“/ClentResources/Styles/editorStyles.css”)’.
-
- Set the primary (default) font. This is done by adding the line, ‘.BodyClass(“solomon”)’
-
- Set the styles available for the ‘styleselect’ toolbar item as a new object, hence:
.StyleFormats( new{title=”[name of font]”, selector=”[comma separated list of block formats to apply the font to (see below)]”, classes=”bornready”})
-
- Finally, set the block formats available for the ‘formatselect’ toolbar item as a semicolon separated list of string values, hence:
.BlockFormats(“Paragraph=p;Heading 1=h1;Heading 2=h2;Heading 3=h3;Heading 4=h4;Heading 5=h5;Heading 6=h6”);
3. Now compile your solution, refresh the CMS in your browser and try out the TinyMCE editor. You should be able to add a paragraph that will be displayed in the default font, in our case, ‘solomon’ but, by highlighting this text and selecting the ‘BornReady font’ from the ‘styleselect’ dropdown in the toolbar, the text will be displayed in the secondary font. By selecting different options from the ‘formatselect’ dropdown in the toolbar, you can change your text from paragraph to H1, H2, and so on.
Example:
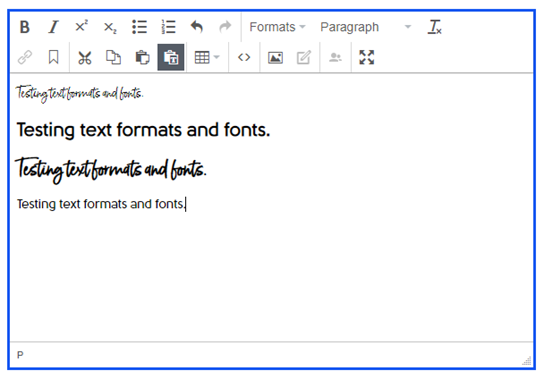
Line 1, paragraph in secondary font.
Line 2, H2 in primary font.
Line 3, H2 in secondary font.
Line 4, paragraph in primary font.
So, there we go, a workable solution to the problem. Please feel free to leave comments.
Thanks to Sam Brooks of dotcentric Ltd for his assistance in arriving to the final solution.
Thanks Jon, this is really helpful!
Thanks Jon, this is really helpful!
I had no idea it was possible to do that, well done Jon ! 🙂