
Securing Web API Endpoints with Owin + Oauth 2.0, Part I
In my last blog, I explained how simple it is to expose a Web API endpoint inside of Episerver. Now, the next question is: How can you secure these endpoints? Here's a scenario - you've created a scheduled job in Episerver to fetch data from an XML file, and you've stored this data using Dynamic Data Store. Now, you want your mobile and other supporting applications to consume this information by hitting Web API endpoints inside of Episerver. Of course you don't want anyone/everyone hitting your endpoints, right? That could lead to a slew of issues. In pure Episerver fashion, it is pretty straight-forward and not as hard as you would think to secure Web API endpoints using Oauth 2.0 through OWIN. In a nutshell, OWIN is a standard that essentially decouples IIS and the web application. In a 2-part series, I'm going to walk you through how you can configure OWIN/Oauth inside of Episerver using ASP.NET Identity and Azure Active Directory as the authentication layer. First, below you will find the steps I took to configure Owin/Oauth and ASP.NET Identity. Disclaimer: I ran this POC on Episerver 10.8.0, so later versions should work with this configuration. Unfortunately, I'm not sure if earlier versions will be compatible:
- Install Owin-specific packages
- Install the Episerver ServiceAPI Nuget Package. This package will give you all of the goodies needed to use OWIN inside of Episerver (because it actually uses OWIN!).
- Configure Startup File
- Create a .cs code file under the root project folder called Startup.cs. This Startup class will be our entry point in configuring our authentication parameters for the Web API endpoints.
- Inside of the Startup.cs file, we need to make sure we lock down the Service API endpoints first. Let's add the following:
public class Startup { public void Configuration(IAppBuilder app) { app.UseServiceApiMembershipTokenAuthorization(); } } - Above the namespace in the Startup.cs code file, add the following code. This line of code tells OWIN to use the Startup class as the entry point for configuration. Insert your namespace in the placeholder [NamespaceGoesHere]:
[assembly: OwinStartup(typeof([NamespaceGoesHere].Startup))]
- Create ASP.NET Identity Backend
- Create another .cs code file under the root project folder named EpiApiAuthDbContext.cs. Inside of this code file, add the code from below. This is a simple Identity DB context that points to our custom authentication database. The string inside of the base constructor is the connection string to the database used to store this information. If the IdentityDbContext class does not resolve for you, please ensure that you have the Microsoft.AspNet.Identity.EntityFramework NuGet package installed. You can use Entity Framework Migrations to create the database, but in my case, I just cracked open SQL Server Management Studio and created the database. Also, don't forget to add your connection string in the web.config.
public class EpiApiAuthDbContext : IdentityDbContext { public EpiApiAuthDbContext() : base("EpiApiAuthContext") { } } - Create another .cs code file under the root project folder named EpiApiAuthRepository.cs. Add the code from below. This repository class will be used to create and find users. In a later step, we will build an action that will create our dummy user to authenticate to the Web API (very similar pattern that's used to set up the admin account for DXC environments). For a full-fledge solution, you can build a UI for users (or admins) to create their username/password combination(s).
public class EpiApiAuthRepository : IDisposable
    {
        private EpiApiAuthDbContext _context;

        private UserManager<IdentityUser> _usrMgr;

        public EpiApiAuthRepository()
        {
            _context = new EpiApiAuthDbContext();
            _usrMgr = new UserManager<IdentityUser>(new UserStore<IdentityUser>(_context));
        }

        public async Task<IdentityResult> CreateUserAsync(UserModel userModel)
        {
            IdentityUser user = new IdentityUser();
            user.UserName = userModel.UserName;

            var createResult = await _usrMgr.CreateAsync(user, userModel.Password);

            return createResult;
        }

        public async Task<IdentityUser> GetUserAsync(string username, string password)
        {
            IdentityUser usr = await _usrMgr.FindAsync(username, password);
            return usr;
        }


        public void Dispose()
        {
            _context.Dispose();
            _usrMgr.Dispose();

        }
    }
- Create another .cs code file under the root project folder named EpiApiAuthDbContext.cs. Inside of this code file, add the code from below. This is a simple Identity DB context that points to our custom authentication database. The string inside of the base constructor is the connection string to the database used to store this information. If the IdentityDbContext class does not resolve for you, please ensure that you have the Microsoft.AspNet.Identity.EntityFramework NuGet package installed. You can use Entity Framework Migrations to create the database, but in my case, I just cracked open SQL Server Management Studio and created the database. Also, don't forget to add your connection string in the web.config.
- Create Oauth Authorization Provider Class
- Create another .cs code file under the root folder named SimpleAuthorizationServerProvider.cs. This class inherits from OAuthAuthorizationServerProvider and overrides two methods: ValidateClientAuthentication and GrantResourceOwnerCredentials.
- ValidateClientAuthentication - this method is used to validate the "client_id" parameter. Here, we will just call the Validate method from the context since we're authenticating with the username/password combo.
- GrantResourceOwnerCredentials - This method will contain logic to authenticate the incoming request's username/password combo via the GetUser method in our Repository class. If the user is found, we will validate the request with the user's ASP.NET Identity. If not found, we will set an error.
public class SimpleAuthorizationProvider : OAuthAuthorizationServerProvider
    {
        public override async Task ValidateClientAuthentication(OAuthValidateClientAuthenticationContext context)
        {
            context.Validated();
        }

        public override async Task GrantResourceOwnerCredentials(OAuthGrantResourceOwnerCredentialsContext context)
        {
            context.OwinContext.Response.Headers.Add("Access-Control-Allow-Origin", new[] { "*" });

            using (EpiApiAuthRepository authRepository = new EpiApiAuthRepository())
            {
                IdentityUser user = await authRepository.GetUser(context.UserName, context.Password);

                if (user == null)
                {
                    context.SetError("invalid_grant", "The user name or password is incorrect.");
                    return;
                }
            }

            var identity = new ClaimsIdentity(context.Options.AuthenticationType);
            identity.AddClaim(new Claim("sub", context.UserName));
            identity.AddClaim(new Claim("role", "user"));

            context.Validated(identity);

        }
    }
- Create another .cs code file under the root folder named SimpleAuthorizationServerProvider.cs. This class inherits from OAuthAuthorizationServerProvider and overrides two methods: ValidateClientAuthentication and GrantResourceOwnerCredentials.
- Complete Startup code
- Add the following code from below to complete the startup file:
- First, we will set up our Oauth Authorization by specifying a Token endpoint, how long the token will stay active, allow insecure requests (TRUE should only be used for development purposes only), and a provider that will handle the authorization of the incoming requests.
- Next, we will register our Web API endpoints. If you've registered your Web API endpoints, in the Global.asax.cs file, please remove that registration
- Also, we will tell the Startup to use this config for Web API.
public class Startup
    {
        public void Configuration(IAppBuilder app)
        {
            var config = new HttpConfiguration();

            this.ConfigureOAuth(app);
            WebApiConfig.Register(config);
            app.UseWebApi(config);
            app.UseServiceApiMembershipTokenAuthorization();
        }

        private void ConfigureOAuth(IAppBuilder app)
        {
            OAuthAuthorizationServerOptions OAuthServerOptions = new OAuthAuthorizationServerOptions()
            {
                AllowInsecureHttp = true,
                TokenEndpointPath = new PathString("/token"),
                AccessTokenExpireTimeSpan = TimeSpan.FromDays(1),
                Provider = new SimpleAuthorizationProvider()
            };

            app.UseOAuthAuthorizationServer(OAuthServerOptions);
            app.UseOAuthBearerAuthentication(new OAuthBearerAuthenticationOptions());

        }
    }
- Add the following code from below to complete the startup file:
- Create Custom Authorize Attribute
- Add a .cs file under the root project folder called CustomAuthorizeAttribute. Add in the code from below. You will need to create a custom authorize attribute to secure the Web API endpoints. When I tried using the out-of-the-box Authorize attribute, Episerver constantly redirected me to the Login page. This was due to the fact that Episerver is still set to use Forms Authentication, which is what we want ultimately. The implementation below will bypass this and let the Oauth server authenticate the user. NOTE: I've set the response to 403 instead of 401 if the user is not authorized. This is because if I set the response code to 401, the response will be redirected to log in Episerver log in page, which is not our desired outcome.
public class CustomAuthorizeAttribute : System.Web.Http.AuthorizeAttribute
    {
        protected override void HandleUnauthorizedRequest(System.Web.Http.Controllers.HttpActionContext actionContext)
        {
            if (HttpContext.Current.User == null || HttpContext.Current.User.Identity == null)
            {
                actionContext.Response = new System.Net.Http.HttpResponseMessage(System.Net.HttpStatusCode.InternalServerError) { ReasonPhrase = "User not is authenticated." };
            }
            else
            {
                actionContext.Response = new System.Net.Http.HttpResponseMessage(System.Net.HttpStatusCode.Forbidden);
            }
        }
    }
- Add a .cs file under the root project folder called CustomAuthorizeAttribute. Add in the code from below. You will need to create a custom authorize attribute to secure the Web API endpoints. When I tried using the out-of-the-box Authorize attribute, Episerver constantly redirected me to the Login page. This was due to the fact that Episerver is still set to use Forms Authentication, which is what we want ultimately. The implementation below will bypass this and let the Oauth server authenticate the user. NOTE: I've set the response to 403 instead of 401 if the user is not authorized. This is because if I set the response code to 401, the response will be redirected to log in Episerver log in page, which is not our desired outcome.
- Create Web API Endpoints
- Create your Web API endpoints inside of the Episerver project. You can refer to my previous blog on how to create your endpoints. For this example, I will have a Web API Controller called SampleApiController with 2 endpoints:
- GetListOfNumbers - this endpoint will return a list of numbers
- AddApiCredentials - this endpoint will create our dummy account to use to authenticate to our Oauth Provider. Of course, the credentials used need to pass any/all security measures created by your team/client/company.
public class SampleApiController : ApiController
    {
        [CustomAuthorize]
        [HttpGet]
        [ActionName("GetListOfNumbers")]
        public IHttpActionResult GetListOfNumbers()
        {
            return Ok(new int[] {1, 2, 3, 4, 5, 6, 7, 8, 9 });
        }

        [HttpPost]
        [ActionName("AddApiCredentials")]
        public async Task<IHttpActionResult> AddApiCredentialsAsync()
        {
            var adminUser = new UserModel()
            {
                UserName = "epiadmin",
                Password = "123456abcdef"
            };

            using(var repo = new EpiApiAuthRepository())
            {
                await repo.CreateUserAsync(adminUser);
            }

            return Ok();
        }
    }
- Create your Web API endpoints inside of the Episerver project. You can refer to my previous blog on how to create your endpoints. For this example, I will have a Web API Controller called SampleApiController with 2 endpoints:
- Let's start testing!!
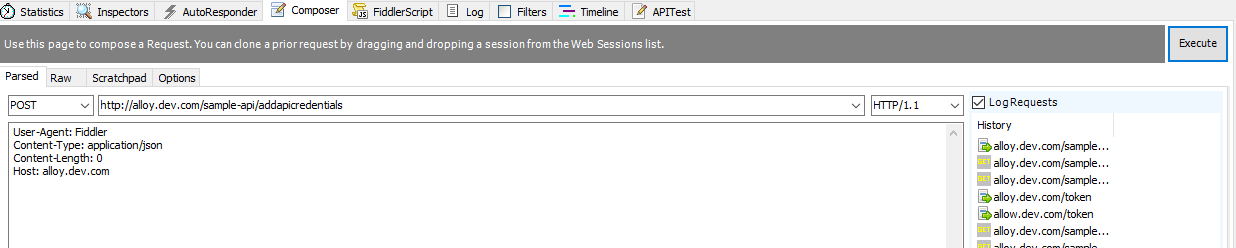
- For testing, I used Fiddler to make my GET/POST calls. However, you can use whatever you tool to test the configuration. First, you will need to create the dummy account to test. Make a POST call to the AddApiCredentials endpoint. This endpoint is very similar to the aspx page used to create an admin account for your Episerver site if deploying to a DXC environment for the first time.
AddApiCredentials Post Call
AddApiCredentials Response

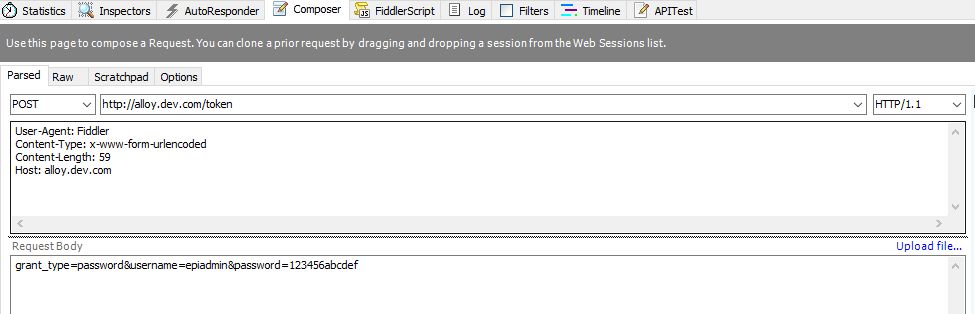
- Next, make a POST call to the token endpoint, sending the user name/password combination. The response should give you a response back with an access token and when it expires. In your client application, you can store this token somewhere.
Token POST Call
Token Response
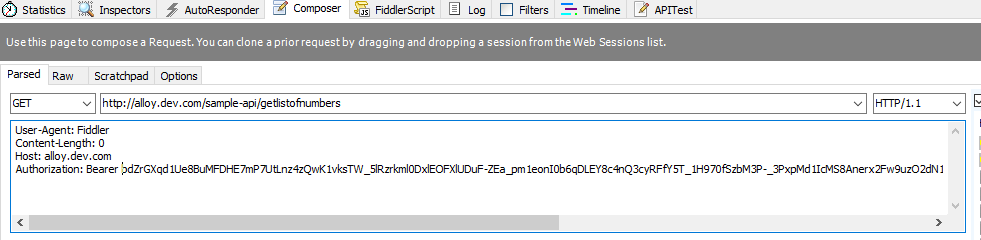
- Next, make a GET call to the GetListOfNumbers endpoint. Make sure that you send the access token as a Bearer token on the Authorization header. The response should give you back an array of numbers!
GetListOfNumbers GET Call
GetListOfNumbers Response

- Next, delete the first four characters in the access token, and make the GET call to the GetListOfNumbers endpoint again. The response should give you a 500 or 403 since the access token is incorrect.
GetListOfNumbers Incorrect Token GET Call
GetListOfNumbers Incorrect Token Response


- For testing, I used Fiddler to make my GET/POST calls. However, you can use whatever you tool to test the configuration. First, you will need to create the dummy account to test. Make a POST call to the AddApiCredentials endpoint. This endpoint is very similar to the aspx page used to create an admin account for your Episerver site if deploying to a DXC environment for the first time.
In Part II, I will discuss how to configure Azure Active Directory instead of ASP.NET Identity to grab an Oauth token to secure your Web API endpoints. Happy Coding!
Great write up. Thanks!
Thanks Aniket!
Nice explanation. Can we get full code for the steps executed above ? it will help developers.
I implemented everything exactly in this article. But then I am getting below error when trying to test
http://localhost:2016/wowapi/1.0/AddApiCredentials/
Thanks very much, this helped us get to the next stage