This topic describes how to set up an Episerver CMS site to run on Amazon Elastic Beanstalk. Most of the topic also should apply to Amazon CloudFormation. The example creates an Alloy sample site from the Episerver Visual Studio plug-in, but you can apply most steps to sites created in other ways. The AWS (Amazon Web Services) Management Console requires an account with login details.
In this topic
Cloud requirements for Episerver CMS
- You need a cloud-enabled license from the Episerver License Center.
- AWS Management Console requires an account with login details.
- Content mirroring is not supported.
- Sites deployed with Elastic Beanstalk have no write access to the file system by default. For example, Admin/System settings that write to web.config do not work.
- Ensure that each deployed application and module are designed for the cloud.
Setting up a cloud website
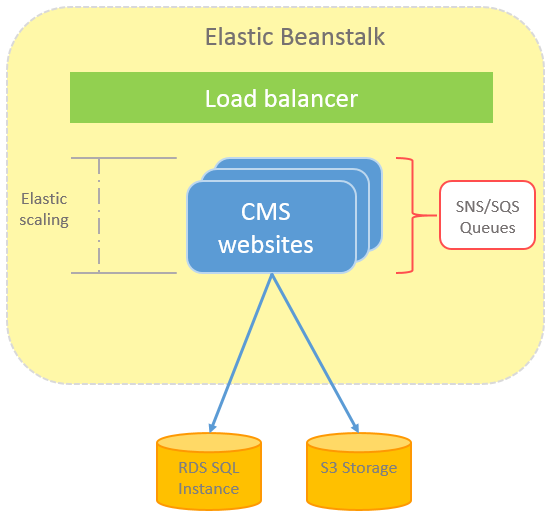
The following image illustrates a CMS website running in an Elastic beanstalk environment with multiple instances. The website instances share the same Amazon RDS (Relational Database Service) SQL instance, and the S3 storage in Amazon that stores binary file data in the cloud environment. The sites are load-balanced, and the SNS (Simple Notification Service)/SQS (Simple Queue Service) message queues manage events between the CMS websites.
Elastic scaling lets you increase or reduce the number of CMS sites from the Elastic Beanstalk administration interface in the AWS management console.
1. Installing add-ons before deploying to Amazon
When you use Amazon Elastic Beanstalk as described in this topic, you should install add-ons on the machine locally and then deploy to Amazon together with the application because when you install an add-on, it is present only on the instance where it is installed; it is not present on other instances of the site (in case you configure elastic scaling).
2. Creating Amazon resources
In this example, you create resources manually from the AWS Management console. Other options are to create the resources from Visual Studio using the AWS Toolkit (see http://aws.amazon.com/visualstudio/), or to define the resources in a cloudformation template and provision the resources through the template.
When you create resources in Amazon AWS, make sure you select the correct region in the upper right corner so your resources are located in a data center closest to your main users.
Tip: Consider creating two instances of each resource (for example, RDS instance, Topic, S3 Bucket) or use two different accounts, one for development and one for production, to make it easy to switch between them simply by changing the configuration.
Creating an Elastic Beanstalk instance
The example in this topic shows you how to create an Elastic Beanstalk instance while deploying the code to Amazon from AWS toolkit. You can also create the Elastic Beanstalk application from the AWS management console and then deploy against that application. If you do, optionally create the RDS database instance while you create the application. (However, to connect to it from your local machine, you need to add an inbound rule to the created security group that allows connection from your machine).
Creating a security group
- Open the AWS management console and select EServices > EC2.
- Select Network & Security > Security Groups in the left menu.
- Click Create Security Group, give the group a name and a description, and click Create.
- In the list, select the created group and select Inbound tab in the lower panel.
- Select MS SQL from the rule drop-down and click Add Rule and then Apply Rule Changes.
Creating an RDS SQL instance
- Open the AWS management console and select Services > RDS.
- Click Launch a DB Instance, and in the engine selection select sqlserver-web (or other Sql server option).
- In Details view, enter the identifier name, size, login user, and password.
- In Additional Config view, select the VPC security group created previously and finish the wizard to create the database instance.
Creating an S3 storage bucket (Optional)
When running on Amazon, media (such as images) should be stored in the S3 storage to enable elastic scaling. You do not need to explicitly create the S3 bucket. The Amazon BLOB provider for CMS creates one if it does not exist.
To create a S3 storage account manually:
- Go to the AWS Management console and select Services > S3.
- Select Create Bucket in the upper right corner.
- In the resulting dialog box, select a region and give the bucket a name.
Creating an SNS Topic (Optional)
To scale the site to run on several instances, set up an SNS Topic in Amazon to handle messages between the site instances. You do not need to explicitly create the SNS topic. The Amazon Event provider for CMS creates one if it does not exist.
To create an SNS topic manually:
- Go to the AWS Management console and select Services > SNS.
- Click Create New Topic.
- In the resulting dialog box, select a name.
3. Installing a database
Create a new database in the RDS database instance:
- Connect to the instance from SQL Server Management Studio. You can find the endpoint in the AWS Management console under the RDS if selecting the previous created instance.
- Run the script from the EPiServer.CMS.Core package ([SolutionDir]\packages\EPServer.CMS.Core.7.6.0\tools\EPiServer.Cms.Core.sql) to install the CMS database schema to the database.
Installing workflow schemas
If you plan to use workflows on your site:
If you need persistence of workflow instances (if you plan to use workflows on the site), then install the workflow schemas to the site. Install SqlPersistenceService_Schema.sql and SqlPersistenceService_Logic.sql from <windir>\Microsoft.NET\Framework64\v4.0.30319\SQL\en.
Note: If you get a <user> does not have permission to run DBCC TRACEON error, you can safely ignore it.
If you do not plan to use workflows:
Remove the Workflow persistence service from web.config; that is, the entry with type SqlWorkflowPersistenceService under workflowRuntime/Services.
Removal of workflow persistance configuration in web.config:
<workflowRuntime EnablePerformanceCounters="false">
    <Services>
      <add type="System.Workflow.Runtime.Hosting.DefaultWorkflowSchedulerService, System.Workflow.Runtime, Version=3.0.00000.0, Culture=neutral, PublicKeyToken=31bf3856ad364e35" maxSimultaneousWorkflows="5" />
      <add type="System.Workflow.Runtime.Hosting.SharedConnectionWorkflowCommitWorkBatchService, System.Workflow.Runtime, Version=3.0.00000.0, Culture=neutral, PublicKeyToken=31bf3856ad364e35" />
      <strong>REMOVE THIS: <add type="System.Workflow.Runtime.Hosting.SqlWorkflowPersistenceService, System.Workflow.Runtime, Version=3.0.0.0, Culture=neutral, PublicKeyToken=31bf3856ad364e35" UnloadOnIdle="true" /></strong>
  </Services>
</workflowRuntime>
Disable workflows completely by adding the disabled attribute to the workflowSettings element.
<episerver>
  (..)
  <workflowSettings disabled="true" />
  (..)
</episerver>
4. Creating a site
- In Visual Studio, create a new project by selecting New... > Project > EPiServer Web site.
- Select Alloy templates (either MVC or Web Forms).
- Uncheck Add EPiServer Search to use search functionality when running in Amazon. See section Search in Amazon.
- Install the NuGet package EPiServer.Amazon to the project.
- Update the configuration for cloud providers.
Add the following block to the episerver.framework section in web.config to map BLOB and event providers to Amazon:
<blob defaultProvider="s3blobs"> <providers> <add name="s3blobs" type="EPiServer.Amazon.Blobs.AmazonBlobProvider,EPiServer.Amazon" accessKey="<your accesskey>" secretKey="<your secretkey>" region="<region code>" bucket="mysitemedia" /> </providers> </blob> <event defaultProvider="amazonevents"> <providers> <add name="amazonevents" type="EPiServer.Amazon.Events.AmazonEventProvider,EPiServer.Amazon" profileName="<your profile name>" accessKey="<your accesskey>" secretKey="<your secretkey>" region="<region code>" topic="mysiteevents" disableAutoCleanupQueue="true|false" maxSendThreads="1" maxEventThreads="1" /> </providers> </event>- profileName or accessKey and secretKey. Replace the value with the keys associated with your account.
- bucket. Replace the value with the name of the S3 bucket created previously.
- topic. Replace the value with the name of the SNS topic created previously.
- region. Replace the value with an AWS region code, such as us-east-1. You can find valid regions for the S3 and SNS/SQS services in the AWS documentation on Regions and Endpoints.
- disableAutoCleanupQueue. Set this value to false if you want to prevent the system from removing orphaned queues automatically. (New in EPiServer.Amazon 9.0.0)
- maxSendThreads. The maximum number of threads that should be used to send messages. Leave this out unless you have a good reason to believe that this could be a problem. Default is 1 thread. (New in EPiServer.Amazon 9.2.0)
- maxEventThreads. The maximum number of threads that should be used to raise events when messages have been received. Leave this out unless you have a good reason to believe that this could be a problem. Default is 1 thread. (New in EPiServer.Amazon 9.2.0)
Note: The attribute bucket for BLOB provider and topic for event provider should be unique per site within the same storage or service bus account and must conform to the name restrictions as set by AWS.
- Update the connection strings in web.config.
Under the connectionStrings section, change the connection string EPiServerDB to the connection string from AWS Management console (see Create a new database). Remember to keep the setting MultipleActiveResultSets=true.
5. Deploying from Visual Studio
Install AWSTools to deploy from Visual Studio. AWSDeploy uses MSDeploy to package the application and includes only the files in the project and bin folder by default.
- Include the modules and modulesbin folders in the project to make sure these are published as well.
- Add any other folder containing files needed for your site.
Note: A filepath can not exceed 260 characters in MSDeploy. As a workaround, you can map the application folder to an Own drive before deployment through a command like c:\<the_path_to_your_application>, and then open up the project in Visual Studio using the new drive. - Because Beanstalk deployment uses MSDeploy, set the IIS Web site property for the Package/publish setting to Default Web Site before deploying by adding the following line to the csproj file for the project:
<DeployIisAppPath>Default Web Site</DeployIisAppPath> - To deploy to Amazon Beanstalk, right-click on your project in Visual Studio and select Publish to AWS.... In the wizard, select Beanstalk as template and proceed through the wizard. After you deploy, access your site through the URL created from the wizard. Updates are done in the same manner by selecting Publish to AWS.... You can manage your application in the AWS Management console under Elastic Beanstalk; for example, redeploy a previous package or scale the number of web sites running the application.
Deploying content
During initialization, a bootstrap feature for content lets you import a package and create a site if you have an export package located at [SolutionDir]\App_Data\DefaultSiteContent.episerverdata. Bootstrap occurs only if the site does not have any previous content.
For cloud deployment, you should first publish the project to the cloud environment before starting a local site configured against the cloud database. Then the bootstrap occurs in the cloud environment, which is much faster (because the site and database are likely in same data center) and also sets the SiteUrl to the cloud URL for the site.
You also can transfer data to an Episerver site running on Amazon with the Episerver CMS export/import functionality. Export the start page from your local site and database and import on the site running in Amazon before continuing to the next step.
6. Creating an admin/edit user
You need to create a user that has access to the admin and edit views to be able to log in to the site on Amazon.
- Configure MultiplexingRoleProvider and MultiplexingMembershipProvider as default providers to enable Windows authentication locally on your machine.
- Browse the site locally but with the database connection string setup against the database in Amazon.
- In the CMS admin view > Administer Groups, create two groups WebAdmins and WebEditors.
- Create a user that is a member of both the created groups.
- Configure the site with SQL membership/role providers as default providers, and ensure that the created user can log in and access admin view.
Search in Amazon
Use a scalable search solution, such as EPiServer.Find, when you host in Amazon. EPiServer.Find is a hosted service that you connect to, and it works the same way as when your site runs on-premises.
If you want to use the built-in EPiServer.Search when running in Amazon, create a separate virtual machine (an EC2 instance) and then install Episerver Search on that instance. Then configure the application to use the search service running on the EC2 instance.
Session State in Amazon
The core parts of Episerver CMS do not use Session State but some functionality does, such as some of the Visitor Groups criteria. To enable session state, use the sticky session feature (also known as session affinity) in the Elastic Load Balancer to make sure requests from a user reach the same server combined with the default in-memory session state provider. You can also enable better scaling using an optimized provider for Amazon, such as the session provider for Amazon DynamoDB.
Related topics
- Deployment
- Deployment scenarios
- BLOB storage and and BLOB providers
- Event management and event providers
Last updated: Oct 26, 2016