Display options
When working with content in a content area, editors often like to specifically choose how the content should be laid out, which means choosing which rendering template should be used to display each item. Display options let developers specify which render templates are available for selection in the user interface.
Configuring display options
You can make rendering templates available for selection in the user interface by adding a EPiServer.Web.DisplayOption to the DisplayOptions service, which you can access as a singleton via ServiceLocator.
var displayOptions = ServiceLocator.Current.GetInstance<DisplayOptions>();
displayOptions.Add(
    id: "promo",
    tag: "promo",
    // The name and description properties can also be reference keys to a language resource to allow internationalization.
    name: "Promotion",
    description: "Promotional content is displayed full width and with background highlighing.",
    iconClass: "icon-promo"
);
See the EPiServer.Web.DisplayOptions class for information and method overloads.
Display options are registered during initialization through an initialization module.
Example: Display options initialization on the CMS sample site.
namespace MyAlloySite.Business.Initialization
{
    [InitializableModule]
    [ModuleDependency(typeof(EPiServer.Web.InitializationModule))]
    public class DisplayRegistryInitialization : IInitializableModule
    {
        public void Initialize(InitializationEngine context)
        {
            if (context.HostType == HostType.WebApplication)
            {
                // Register Display Options
                var options = ServiceLocator.Current.GetInstance<DisplayOptions>();
                options
                    .Add("full", "/displayoptions/full", Global.ContentAreaTags.FullWidth, "", "epi-icon__layout--full")
                    .Add("wide", "/displayoptions/wide", Global.ContentAreaTags.TwoThirdsWidth, "", "epi-icon__layout--two-thirds")
                    .Add("narrow", "/displayoptions/narrow", Global.ContentAreaTags.OneThirdWidth, "", "epi-icon__layout--one-third");

                AreaRegistration.RegisterAllAreas();

            }
        }

        public void Preload(string[] parameters){}

        public void Uninitialize(InitializationEngine context){}
    }
}
Appearance in the user interface
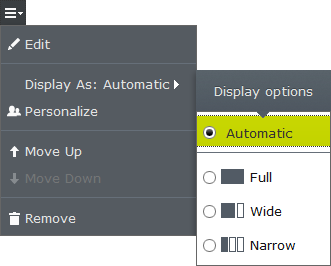
Adding display options to the site automatically enables an addition option in the context menu for content within a content area. The example below is from the CMS sample site. By default the Automatic option is selected, which means that the content is using the rendering template specified by the content area. Selecting a display option other than Automatic renders that particular content in that content area using the rendering template associated with the display option.
Because display options are available in the context menu, you can select an option whose tag do not match a rendering template for the given content. In this scenario, a message is rendered instead of the content, which informs you that the content cannot be displayed with this chosen display option.
Related topics
Last updated: Feb 10, 2016