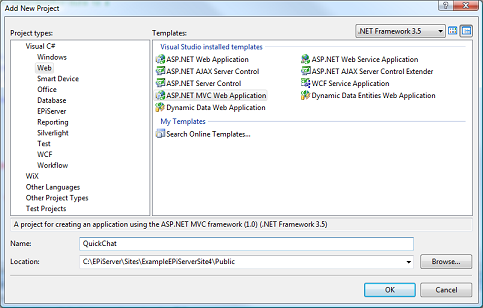
Setting up the environment
Start by installing an Episerver CMS website using the standard installer. The default options produce a website in c:\EPiServer\Sites\[MySiteName]. In the following example, the site was installed in c:\EPiServer\Sites\ExampleEPiServerSite4.
Note: While not required for normal operation, this tutorial assumes you have installed ASP.NET MVC.
Develop gadgets in a separate project
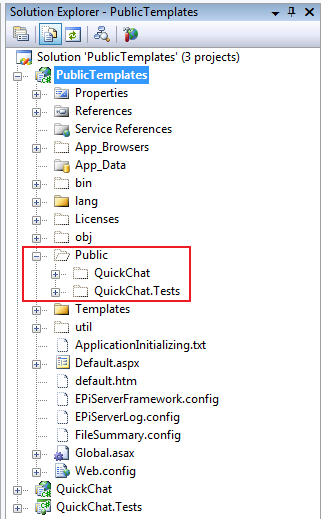
- Create the module as a separate project under the Public folder of the Episerver site. Optionally, you can add your gadget to the existing PublicTemplates project.
- Add a unit test project if you want. This tutorial will not cover unit testing.

- When you enable Show all files, the quick chat module is placed under the development site.
Modify the default MVC application
You should make the following modifications to the default MVC application.
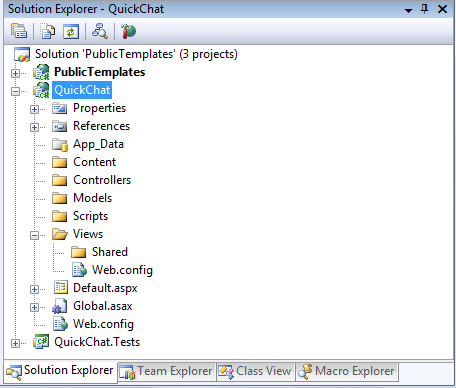
- Remove default controllers and views.
Remove the default controllers, views and scripts (HomeController.cs, /Views/Home, and so on) according to the following image. You always can use another project to play with ASP.NET MVC. If you have added a unit test project, you also have to remove the related test functions from the QuickChat.Test project.
- Clean up web.config.
The web configuration is inherited from the public templates site, but if you leave some settings in the module’s web.config, you will keep intellisense enabled.
-
Copy the root web.config file from the QuickChat example zip (not the one in the Views folder) to your project.
- Change the output path.
Open the QuickChat project’s properties and change the default build output path of the quick chat project to ..\..\bin\.

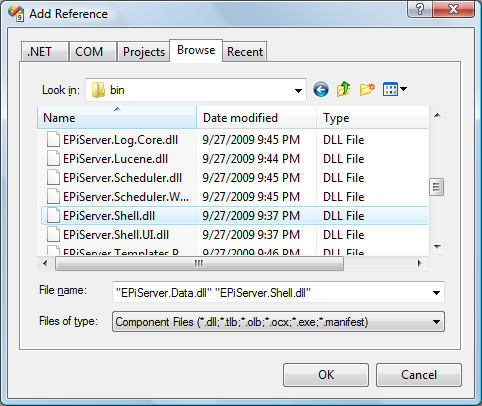
- Add references to EPiServer.Shell and EPiServer.Data (you will need these later on). You can find a copy of these in the public template’s bin folder.
- Register the module in web.config.
Open the public templates’ web.config file and find the episerver.shell configuration section. Add the QuickChat module to the /configuration/episerver.shell/modules/ path. This is an excerpt of the added configuration:
XML<episerver.shell> <publicModules rootPath="~/modules/" autoDiscovery="Minimal"> <!-- QuickChat is assumed to be located in ~/modules/QuickChat --> <add name="QuickChat"> <assemblies> <add assembly="QuickChat"/> </assemblies> </add> </publicModules>
Develop gadgets in public templates project
While you create gadgets in a separate project, you can create gadgets in the PublicTemplates.csproj project by modifying the configuration and the csproj file.
- Configuration: Register the Public Templates in the configuration/episerver.shell/publicModules configuration section. The resourcePath attribute tells the system to look for views in the folder /Views/[ControllerName]/[ActionName].ascx instead of the default location under the modules folder. Also update the add assembly section to any new name chosen for the public templates application.
XML
<episerver.shell> <publicModules rootPath="~/modules/" autoDiscovery="Minimal"> <add name="Public" resourcePath="~/"> <assemblies> <add assembly="EPiServer.Templates.Public" /> </assemblies> </add> - References: Add references to System.Web.Mvc, EPiServer.Shell and EPiServer.Data.
- Create Folders.
The ASP.NET MVC framework suggests that you organize the code in the following folders; add these to your project:
- Controllers
- Models
- Views
- Visual Studio integration: ASP.NET MVC includes wizards to create controllers and views. These are not enabled in the PublicTemplates.csproj installed with Episerver CMS but you can enable them in the file.
- Right-click the project > Unload > Edit. Add {603c0e0b-db56-11dc-be95-000d561079b0}; to the list of existing project type guids.
- Save, right-click and select Reload Project.
XML
<Project>
    <PropertyGroup>
       <ProjectTypeGuids>{603c0e0b-db56-11dc-be95-000d561079b0};{349c5851-65df-11da-9384-00065b846f21};{fae04ec0-301f-11d3-bf4b-00c04f79efbc}
</ProjectTypeGuids>
Starting out with gadgets
- Create a gadget.
- Go to the QuickChat project and right-click the Controllers directory > Add Controller.
- Name the controller and click Add.
- Add the gadget attribute to the controller template created for you.
- To reduce time-to-dashboard change the return statement to return HTML content directly (you will change this soon).
C#
using System.Web.Mvc; using EPiServer.Shell.Gadgets; namespace QuickChat.Controllers { [Gadget] public class QuickChatController : Controller { public ActionResult Index() { return Content("<strong>Some</strong>thing!"); } } } - Compile and switch over to the dashboard.
- Click the (+) symbol of QuickChat in Add Gadgets to add this new gadget.
The dashboard contains "something" that you can continue to work with.
Background for dashboard gadgets
Dashboard gadgets are developed using the MVC model. The following example shows the model from the perspective of processing a server request.
Incoming Request > Dashboard Controller Action > Dashboard View > Outgoing Response
The Controller Action and View represent code that is developed to provide functionality. The arrows (>) represent pluggable points provided by the ASP.NET MVC framework.
In a typical ASP.NET MVC application, the flow spans over a complete page request. However, in the case of dashboard gadgets, this is slightly different:
Incoming Request  Dashboard Controller Action  Dashboard View
    foreach (gadget on userDashboard)
     {
     Partial Request  Controller Action  View
      }  Outgoing Response
Dashboard gadgets use the same principles as a typical MVC application but only renders a portion of the dashboard.
Next steps
- Developing gadgets, step 1: Showing information
- Developing gadgets, step 2: Interacting with the server
- Developing gadgets, step 3: Developing the client side
- Developing gadgets, step 4: Applying styles and CSS
Last updated: Nov 25, 2015