Five New Optimizely Certifications are Here! Validate your expertise and advance your career with our latest certification exams. Click here to find out more
AI OnAI Off
Five New Optimizely Certifications are Here! Validate your expertise and advance your career with our latest certification exams. Click here to find out more
XForms are deprecated. Use Episerver Forms instead.
While existing solutions continue to work, you should not build new solutions on this API. It will be phased out in the future.
This topic describes how to work with XForms in Episerver CMS. XForms contains logic to store and present forms and data posted from forms. Together with the forms editor in the Episerver CMS edit view, it lets editors create and modify forms and view form data. The XForms architecture enables customization, letting developers adapt the XForms functionality.
Editors use the Forms Editor to create forms in edit view. When saved, the content of the form is saved as XHTML and XForms markup.
When the form is presented, it loads as web controls and renders as HTML to the client, so there is no need to install additional software to support XForms to the client. When you take this approach, Episerver CMS does not support the client-side functionality that may be available when you use an XForms browser plug-in.
Form folders let you organize a group of forms in a folder structure, which can be useful if the site contains many forms. You also can set a default folder for forms for either the entire website or parts of the website, making it easier for editors to manage forms by adding a DefaultFormFolder dynamic property and then setting the property value to the folder of your choice for the part(s) of the website you want to affect.
When you create a new form page and select a form, the default folder is the starting point for the form selection. When you create new forms, the default folder is suggested. This property is supported, but is not included in the sample site and is therefore not included in the language files.
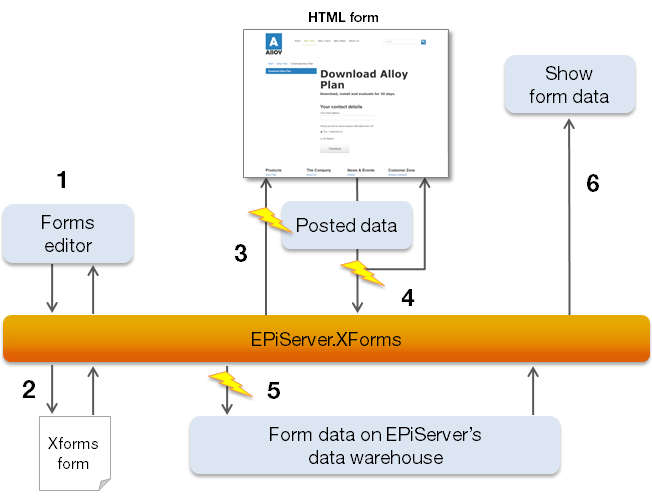
Steps 1 and 2 can be repeated until the form has the desired look and functionality.
The XForm class is a representation of the content and the structure of the form. The content of the form is saved as XML. The XML contains the instance node, which contains the data for the form such as field validation and default values for fields. It also stores information about the structure of the form; this is stored as XHTML with controls from the XForms namespace. This class is responsible for creating a default XFormData object from its instance node.
The following code shows an example of the content of an XForm. When you export a form with the Episerver CMS forms editor, the form content is represented in this format.
<root xmlns:xforms=a href="http://www.w3.org/2002/xforms">http://www.w3.org/2002/xforms</a>
      xmlns:xsi=<a href="http://www.w3.org/2001/XMLSchema-instance">http://www.w3.org/2001/XMLSchema-instance</a>>
    <model>
           <instance>
                </Author />
                  </instance>
    </model>
      <table id="id_matrix" border="0">
              <tr>
                  <td valign="top" width="100" height="10">
                                   <span id="id_fields1">Author</span></td>
                  <td valign="top" width="200" height="10">
                      <xforms:input ref="Author" value="" id="id_fields2" size="40" /></td>
              </tr>
      </table>
</root> Note: Even though this example shows a form that is structured using HTML tables, there are no limitations for the structure of the form to use other elements, such as the <div> element. In Episerver CMS, the built-in form editor creates a form using HTML tables.
The XFormData class contains information on the content of a posted form. Normally a new XFormData class instance is created when a form is posted, but it is also possible to define an old post when loading a form to be able to re-edit data. This is also the class representing existing data when loading form data for a form.
The DataTypes class contains information about the data types available for form fields. These are contained in a public Types property, which is basically a hash table that contains keys and values, where keys are the unique key for the data type and the value is a regular expression.
When you post form data, input is validated against the regular expression for the data type of the input control. If no data type is specified for the control, the data is validated against the public InvalidDefaultInputRegex string property. A default validation prevents malicious data from being posted from a form.
XFormControl is a web control displays an XForms form and makes sure that the input is validated. The class exposes a public method, SubmitForm, to be able to submit form data. The form itself does not trigger the actual posting. This is handled by any existing submit web controls in the form, which is also why it is possible to have several buttons on the same form that may trigger different actions. Of course, it is also possible to call this method from the code.
What happens when the form is loaded?
What happens when data is submitted?
The following table shows the controls and their corresponding HTML tags used while rendering themselves:
| Web Control | HTML |
|---|---|
|
Input |
<input /> |
|
Select |
<input type=”checkbox” /> |
|
Select1, with Rendertype.Full |
<input type=”radio” /> |
|
Select1, with Rendertype.Minimal |
<select></select> |
|
Submit |
<input type=”submit” /> |
|
TextArea |
<textarea></textarea> |
|
Secret |
Not implemented yet |
You can send an XFormData object to different channels. A channel might be storage in the database, an email address or a URL. The ChannelOptions property specifies one or several channels to which the data is sent.
| Channel Name | Description |
|---|---|
|
Database |
The entire XFormData object is serialized and saved to the tblItem table in the database. |
|
|
The content of the form data is transformed using a predefined XSLT. |
|
CustomUrl |
The values for the form is uploaded to a URL using the System.Net.WebClient class. |
In Episerver CMS, the XForm class has several methods for accessing form data. GetPostedData lists form data objects that specify certain criteria such as posted date, form and page ID. In Episerver CMS, there are overloads of this method that supports paging also. GetPostedDataCount gets the number of users that have posted data to a form and GetPostedDataStatistics calculates statistics for a form directly in the database.
You can re-edit data that is posted to the database (or another custom location if you can load and save the XFormData object). To do this, create an XFormControl object and set its Data property to the XFormData object you want to load. The form is loaded with the values from the posted data. If the data is posted to the database, the old data is replaced in the database.
You also could load an XFormData object and modify the object programmatically. By using the Send method, you can store the modified content again.
There are two main ways to edit the appearance of a form.
If you want to change the appearance of the XForm web controls, add or modify the attribute collection for the control. By using CSS and setting the class attribute for the control, you could do a lot for the appearance of the form control. In Episerver CMS the ExtractXFormControls method gets an ArrayList containing the input elements for the form.
When you use the email option for sending XFormData, the content of the form data is transformed using an XSLT schema. Unfortunately, you cannot specify a custom XSLT schema that is used to transform the form data to an email. You still can implement your own email handling by adding custom logic to the BeforeSubmitPostedData event on the XFormControl web control. Before exiting your custom logic, remove the email option from the e.FormData.ChannelOptions property to ensure that the regular email channel is not triggered.
If you simply set e.FormData.ChannelOptions to ChannelOptions.None, you lose additional channels that the form data is sent to, such as the Database Channel.
When you use XForms with MVC, required functionality are automatically injected into the controller when using the ActionControllerBase base class(which, for example, PageController<T> inherits from). Use the normal HTML-helper Html.PropertyFor in the view to render the XForm.
Static events on the XFormActionHelper class exist for both BeforeSubmitPostedData and AfterSubmitPostedData to listen and act on posted data via MVC for the whole site.
You also can handle the posting in a method on the controller. To take more control over the posting, add an XFormParameters instance to the following:
PropertyFor: @Html.PropertyFor(x => x.CurrentContent.MyForm, new{ XFormParameters = new EPiServer.XForms.Util.XFormParameters() { PostAction = "Posted", SuccessAction = "Success", FailedAction = "Failed" } })In the XFormParameters class, you can specify the methods to use when you post the XForm, and the methods to use when the user gets validation errors, and when the XForm successful gets posted. The controller may look something like the following code when you take care of the post action:
public class XFormPageController : PageController<XFormPage>
{
    private XFormPageUnknownActionHandler _xformHandler;

    public XFormPageController(XFormPageUnknownActionHandler xformHandler)
    {
        _xformHandler = xformHandler;
    }

    public ActionResult Index(PageData currentPage)
    {
        return View(currentPage);
    }

    #region Success and failed actions

    [AcceptVerbs(HttpVerbs.Post)]
    public ActionResult Success(PageData currentPage, XFormPostedData xFormPostedData)
    {
        return View("Success", currentPage);
    }

    [AcceptVerbs(HttpVerbs.Post)]
    public ActionResult Failed(PageData currentPage, XFormPostedData xFormPostedData)
    {
        return View("Failed", currentPage);
    }

    #endregion

    [AcceptVerbs(HttpVerbs.Post)]
    public ActionResult DoSubmit(XFormPostedData xFormpostedData)
    {
        return _xformHandler.HandleAction(this);
    }
}
Validation is performed automatically when you use the XFormHandler on the server side. To enable client validation, add the HTML-helper EnableClientValidation in your view.
To render an XForm property on a page, use the Property and RenderPropertyXForm HTML helper methods in the view. The Property method uses the default behavior, while the RenderPropertyXForm takes the name of the property, and an XFormParameters class as parameters. Optionally use the XFormParameters parameter to override the default settings.
If you do not set the SuccessAction and FailedAction properties on the XFormParameters class, the system uses default views for successful and failed posts. If you set SuccessAction to Success and FailedAction to Failed, the system calls the Success or Failed action in the controller, depending on whether a validation error occured when posting the form. You must create the Success and Failed methods in the controller to make it work.
<%@ Control Language="C#" Inherits="System.Web.Mvc.ViewUserControl" %>
<%@ Import Namespace="EPiServer.XForms.Util" %>

<section id="form">
    <%--<% Html.EnableClientValidation(); %>--%>
    <%: Html.ValidationSummary() %>
    <% Html.RenderPropertyXForm("XForm", new XFormParameters() { SuccessAction = "Success", FailedAction = "Failed" }); %>
    <%--<%: Html.Property("XForm") %>  --%>
</section>
Last updated: Sep 21, 2015