Commerce-specific updating steps
Converting Commerce 7.5 projects to use NuGet
This section describes how to update an existing Commerce 7.5 project to use NuGet updates, since a Commerce site created using Deployment Center will not have any NuGet references. The recommended way to add the NuGet references is installing the 7.6.1 NuGet package, and then upgrade to the latest package. That way several automatic cleanup steps will be performed by NuGet.
Updating the Commerce front-end website
Note: A Commerce website consists of a front-end and a back-end site with separate projects. When updating, ensure that the correct packages are applied to each project.
Do the following to update the front-end site for your Commerce solution:
- Install or update the main packages EPiServer.Commerce and EPiServer.Commerce.UI.ManagerIntegration.
- Rebuild the solution and load the website. Since the database version has not been updated at this stage, an error message will be displayed.
- Follow the instructions in the error message to update the database version, and reload the website.
- If the update includes migration steps, a specific migration page will be displayed (see below). Click Execute all remaining steps, and let the procedure finalize (unless you have implemented the automatic procedure for this, see below).
- When the migration has successfully finalized, click Go to start page to reload the website.
Refer to Troubleshooting Commerce updates if you experience problems during the update or when running the site afterwards.
[New in 7.6.0]
From EPiServer Commerce UI 7.6.0 the UI components have been converted to a standard NuGet package. Install the EPiServer.Commerce.UI package on your website. Use Install-Package EPiServer.Commerce.UI for the main UI Component and Install-Package EPiServer.Commerce.UI.ManagerIntegration for the Commerce Manager integration.
See the ReadMe file when installing EPiServer.Packaging.UI.
[New in 7.10.0]
An update may have one or more migration steps that need to be executed in order for the site to work correctly. If so, any request to the website will be redirected to a migration page. From there it is possible to run the migration steps and track the progress ("CommerceAdmins" role is required to access the page). Once all steps have been completed successfully, the redirects to the page will stop, and the website will be back to normal.
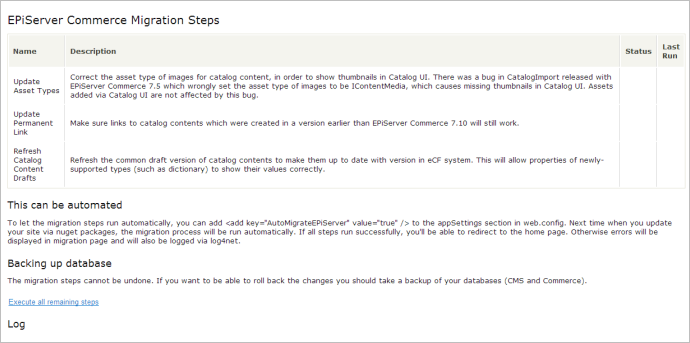
It is possible to have the migration started automatically during the sites initialization. That is done by adding an app setting called "AutoMigrateEPiServer" and setting the value to "true". However, until all steps have been completed, any requests will still be redirected to the migration page, where it is possible to track the progress.
Updating Commerce Manager
Ensure that the EPiServer.CommerceManager package updates are only applied to the Commerce Manager back-end project, and not the front-end project. When updating A Commerce solution to the latest, you might also need to specifically update the CMS packages for the Commerce Manager site, in order to avoid discrepancies between database assemblies.
The first time you upgrade Commerce Manager past version 7.5.x (to 7.6.0 or later) you will need to run the Update-Package command twice. The reason is that the dependencies changed for version 7.6.0 and NuGet will not upgrade to the correct version at the same time that the package layout changes.
Commerce Manager does not come with a Visual Studio project, which is required for NuGet packages to be applied. To apply updates to Commerce Manager, add a Visual Studio project (only containing the dependencies of Commerce Manager) as follows:
- Unzip the contents of the Commerce Manager updater package to the web root of the Commerce Manager site, which means that the solution file contained in the package should be on the same level as web.config.
- Go to the package manager console and make sure that the EPiServer feed is selected.
- NuGet will detect that the referenced packages need to be restored. If not already done, click the button to restore the packages.
- Update the EPiServer.CommerceManager package to the latest version.
- Build the solution.
- Optionally, open the bin folder of the Commerce Manager site and remove the RemoveMePlease dummy assembly which was created when the solution was compiled. You can also remove the files and folders that you unzipped (including the packages that NuGet downloaded into the Packages folder). For development projects it is recommended to keep the unzipped files around to make it easier to do subsequent updates.
- Go to the IIS manager and remove the virtual directory for the "Apps" folder for the Commerce Manager website.
Version-specific notifications
Important notifications regarding changes in specific versions of Commerce releases.
- EPiServer update 36 with Commerce 8.0.0, included some important changes:
- Breaking changes Commerce 8
- Upgrading to .NET Framework 4.5
- Removing dependency on Common Framework
- Database changes for Commerce inventory service
Troubleshooting update issues
Refer to Troubleshooting Commerce updates if you experience problems during the update or when running the site afterwards.