A critical vulnerability was discovered in React Server Components (Next.js). Our systems remain protected but we advise to update packages to newest version. Learn More.
AI OnAI Off
A critical vulnerability was discovered in React Server Components (Next.js). Our systems remain protected but we advise to update packages to newest version. Learn More.
Solr is an enterprise level search engine. The quick setup instructions will result in a fully functional search engine for use with the ECF, and the additional instructions below the quick setup will detail how to configure a more complex environment and create a more customized and efficient Solr configuration.
The Solr search provider for ECF is built to work with Solr 3.5.0, the current version at the time the provider was released. While 3.5.0 is the officially supported versions, the provider is written to be compatible with future versions of Solr.
Download the Windows Service Installer for Apache Tomcat 6, and run the installer. The default options will produce a working solution, however we recommend that the "Native" option under the "Tomcat" node is selected on the components screen for best performance.
Within the directory where Tomcat was installed, edit the conf/server.xml file, and find the HTTP connector element (the port may be different, depending on your installation settings):
<Connector port="8080" protocol="HTTP/1.1"
connectionTimeout="20000"
redirectPort="8443" />
Add the attribute URIEncoding="UTF-8" to this element to enable handling URIs with UTF-8 characters to the connector element. The Tomcat service will need to be restarted for this setting to take effect.
The Solr installation files (version 3.5) are available as a download package from Apache Solr. The webapps directory from the ECF distribution will merge into an existing webapps directory in the Tomcat install.
Open the configs/Mediachase.Search.config files in each web application, both public and back-end sites, and set the defaultProvider attribute of the SearchProviders element to "Solr35SearchProvider". In the provider element named "Solr35SearchProvider", set the URL attribute to point to the Solr application in your Tomcat instance. For example: http://{server}:{port}/solr, unless you have specifically configured a different application location.
The provider element should look similar to this example:
<add name="Solr35SearchProvider" type="Mediachase.Search.Providers.Solr35.SolrSearchProvider, Mediachase.Search.Solr35SearchProvider" queryBuilderType="Mediachase.Search.Providers.Solr35.SolrSearchQueryBuilder, Mediachase.Search.Solr35SearchProvider" url="http://localhost:8080/solr" shareCores="true" facetLocalizedFieldValuesOnly="true" commitWithin="10000" maximumBatchSize="50" />If multiple applications are used for the ECF, a multi-core setup should be used. This will create separate configurations and search indexes for each application. If multiple instances of the ECF share the same Tomcat instance, they must use a multi-core setup, and a single application name may not be reused in more than one instance.
Complete the quick setup instructions above before switching to a multi-core configuration.
To add a core for an application, edit the solr/solr.xml file in the Tomcat instance. In the cores element, add a core element named with the application name followed by ".catalog", and a directory named with the application name. For example, if the application name is MyApplicationName, add line #4 from the following XML to your solr.xml file:
123456 <solr persistent="false">
<cores adminPath="/admin/cores">
<core instanceDir="catalog" name="catalog"/>
<core instanceDir="MyApplicationName" name="MyApplicationName.catalog"/>
</cores></solr>
Each core needs a directory for configuration and index files. For the default shared core, this is the solr/catalog directory in the Tomcat instance, as configured by the instanceDir value in the default "catalog" core.
To create a directory for the newly added core, copy the catalog directory from the Tools/Search/SolrServer350/solr directory in the ECF distribution into the solr directory in the Tomcat instance, and rename it to the application name (the value of the instanceDir attribute in the new core element).
Update the ECF search configuration by editing Mediachase.Search.config for each web application, and setting shareCores="false" in the Solr35SearchProvider provider element.
When these steps are completed, restart the Tomcat instance so that the changes will be loaded, and rebuild all indexes.
The Solr configuration for each core includes a schema, describing the fields of the search documents and how they are stored and indexed. This configuration is contained in the Tomcat instance at solr/catalog/conf/schema.xml (for multi-core environments, replace catalog with the appropriate core directory). While the schema.xml provided with the ECF distribution should work for most implementations, more efficient indexing and searching performance can be achieved by customizing the schema for your own particular catalog configuration.
The catalog metafield edit screen of the commerce manager has five options for configuring the search properties of a metafield (some or all of these value may not be present for some metafield types):
A field does not have to have Allow Search checked to be included in the default search.
When the search properties are configured as desired, and the Solr35SearchProvider is configured as the default search provider, go to the Search Index screen within the Administration tab. This screen will now include a stub of generated code to customize the Solr schema configuration:
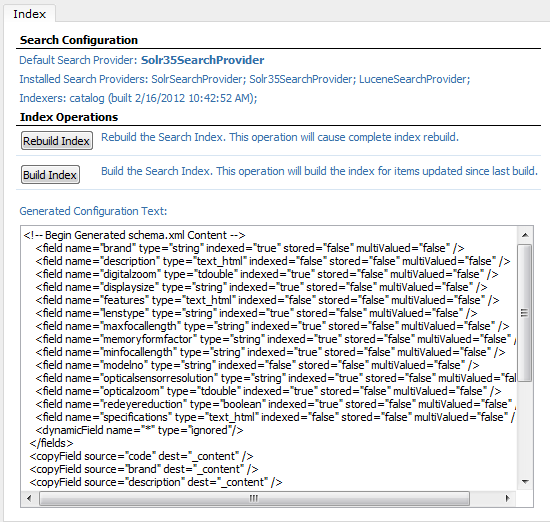
To make use of this generated schema configuration, edit the schema file in the Tomcat instance at solr/catalog/conf/schema.xml (replacing catalog with the appropriate directory for a multi-core configuration). Find the comments indicating the section of the configuration to replace with generated content (searching for "!!!" will go to the appropriate place in the file).
In the unmodified configuration, the section to replace has the following content:
<!-- !!! Replace content between this line and the next comment with "!!!" to use generated MetaData schema.xml configuration. -->
<dynamicField name="*" type="text" indexed="true" stored="true" multiValued="false"/>
</fields>
<copyField source="*" dest="_content"/>
<!-- !!! Replace content between this line and the previous comment with "!!!" to use generated MetaData schema.xml configuration. -->
Replace the content between these two comments with the XML copied out of the search index interface. To make use of the changes, the Tomcat instance must be restarted, and the index must be rebuilt.
Last updated: Oct 21, 2014